
Creating a New Appointment
You can schedule a new appointment with your client on the Calendar page using the following available tools:
The service sets the length of the appointment. When you attach a service to a new appointment, Zanda saves the appointment as the service’s Duration, measured from the start time. This applies however you create the appointment, and it includes a service booked through a session pack. It is applied on save, so the end time you see while you are still filling the appointment in is not necessarily the one the appointment ends up with. See Adding and Editing Services for where a service’s Duration is set.
A service shorter than 5 minutes still produces a 5-minute appointment. Five minutes is also the shortest appointment Zanda saves: if you set an end time less than 5 minutes after the start, Zanda asks you to extend it with Please ensure that the duration of the appointment is at least 5 minutes. If a service’s Duration would carry the appointment past midnight, Zanda ends it at 11:59 pm on the start date.
Option 1: Using the Calendar Display
-
Using you mouse cursor, highlight the time slot in which you’d like to create a new appointment.
-
The New Appointment Panel will open up.
-
The appointment booking panel is divided into three sections:
- When & Where,
- Client and
- Appointment Details.
In Appointment Details, the service list groups services under Provided Services and Other Services once you have chosen a practitioner. Services that practitioner provides are listed first. Every service stays selectable, so this changes the order only. The headings appear only when the practitioner has services in both groups. See Marking Which Services Each Practitioner Provides.
Fill in the information asked under each section.
- After filling in the appointment information, click Save.
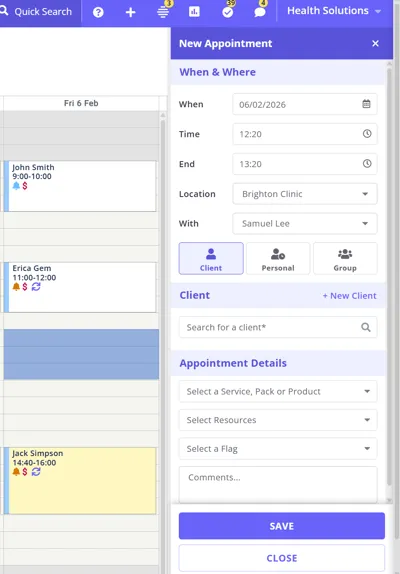
This will add your newly created appointment to your Zanda calendar.
The panel pre-fills the end time from the slot you highlighted, and how many minutes that slot covers comes from Minutes Per Calendar Block under User Menu > Account Settings > Schedule > Calendar Display, 30 minutes unless you have changed it. See Editing Your Calendar Display. Choosing a service does not redraw the end time on screen. So if you highlight a single 30-minute block and attach a 75-minute service, the panel keeps showing a 30-minute appointment while the saved appointment is 75 minutes. The calendar shows the real length as soon as it refreshes.
Option 2: Using the Quick Actions menu (➕ icon)
From any page in Zanda, you can click the ➕ icon on the top panel and select Appointment.
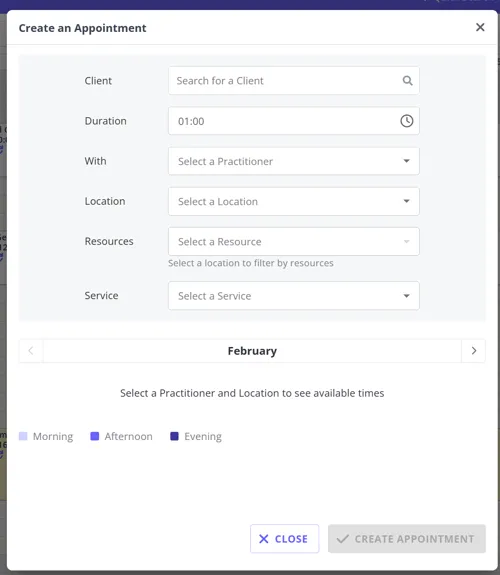
The new appointment modal will open. Fill in the available fields and a new appointment will be created for you.
This modal asks for a duration up front and defaults to 60 minutes. The duration you pick decides which slots are offered, and the service still sets the saved length. If you pick a longer duration and attach a shorter service, the appointment saves at the service’s Duration, not the one you picked.
Zanda keeps the duration and the service in step in the other direction. If you select a service that needs more time than the duration you picked, Zanda leaves the service unchanged and shows This service requires more time than selected. Please either select a shorter service or extend the appointment duration. If you shorten the duration below the length of a service you already selected, Zanda keeps the duration you had and shows The selected service requires more time than this duration. Please either select a longer duration or change the service.
If an Appointment Doesn’t Save
Occasionally you fill in the New Appointment Panel, click Save, and the appointment doesn’t appear on the calendar. Here’s what’s happening and what to check.
What the greyed-out Save button means. The Save button greys out as soon as you click it, and stays greyed out while Zanda is saving. That is normal—it stops the appointment being created twice. If the button becomes clickable again and the appointment still isn’t on the calendar, the save was attempted and did not complete. It does not mean your click was missed, so clicking Save repeatedly won’t help.
A missing invoice is the same problem, not a second one. When an appointment has a Service or Pack on it, Zanda creates the appointment and its invoice together in the one save. So if the appointment didn’t save, there is nothing for the invoice to attach to and no invoice is created either. You don’t need to raise the missing invoice separately.
Check the appointment actually has a service on it. If the appointment saved but no invoice appeared, open the appointment and check the Appointment Details section. An appointment saved without a Service or Pack selected won’t generate an invoice—that’s by design. Add the service to the appointment and save again, and the invoice will be created.
Check whether new appointments are allowed for that client. A client can be set so that team members can’t book new appointments for them. This is a per-client setting, so it will look random—most clients book normally and one or two won’t. Go to the client’s profile > Admin > Manage and check Allow New Appointments > Users can book appointments for the client. If it’s turned off, turn it on and create the appointment again. See Client Profile in Detail.
Check the appointment isn’t already there. Before recreating it, check the practitioner’s calendar column on the date you were booking, and check the client’s profile for a future appointment. If the appointment did save, creating it again will leave you with a duplicate.
If it keeps happening, send us the details. Intermittent save failures need to be traced against your account, so contact Zanda Support with:
- the date and time of the appointment you were trying to create
- the practitioner, location, and service selected
- roughly when you tried (date and time in your local timezone)
- whether any message appeared on screen
- whether it happens to the same client repeatedly, or a different client each time
That’ll help us to find the failed save in your account’s records and identify what stopped it.
If nothing happens when you click the calendar
If clicking an existing appointment, or highlighting an empty time slot to make a new booking, does nothing at all, with no appointment panel and no message, check that user’s Edit Appointments permission first. Without it, the user has read-only access to the calendar. They can still see the calendar, but the appointment panel doesn’t open, and they can’t create, move, resize, or right-click appointments.
This is set per user, so it usually affects one team member while everyone else books normally. If a colleague can open the appointment panel in the same account, the cause is almost certainly a permission, not the browser. Clearing the cache or switching browsers won’t fix it.
Administrative access doesn’t include it. A user set to the Administrative access level still needs Edit Appointments turned on separately. The access level only decides default access to clinical records. It doesn’t grant calendar editing.
To check or change it:
- Go to User Menu > Account Settings > Team > Users > User Management, and open the user’s profile.
- Under User Permissions, find the Scheduling permissions.
- Turn on Edit Appointments, then click Save.
- Ask the user to refresh their calendar. Clicking an appointment or an empty slot should now open the appointment panel.
Only someone who can manage users and their permissions can change this. If that isn’t you, ask your practice administrator or the account’s Master User. The Master User has every permission, so this check doesn’t apply to them.
For what each scheduling permission controls, see Managing Users, User Permissions For Practitioners, and User Permissions For Reception/Admin Staff.
If an Appointment Is Missing From One Person’s Calendar
Sometimes an appointment shows on the calendar for admin users and other team members, but the practitioner it is booked with can’t see it when they log in to their own account, while all their other appointments show normally. The appointment hasn’t been lost. What differs is the calendar view each person is looking at: calendar view settings are per user and are remembered in each person’s own browser, so two people signed in to the same account can be looking at the same day through different filters.
(If nobody can see the appointment, it’s a different problem. See If an Appointment Doesn’t Save above.)
Ask the practitioner to check the following in their own login, in this order.
Set the Locations Filter to All Locations. If your practice has more than one location, the calendar toolbar shows a Locations Filter. When it’s set to a single location, appointments booked at any other location are left out of the view completely. They aren’t dimmed or greyed out, they simply aren’t there. Zanda remembers the location each person last selected in their own browser, so the practitioner can easily be sitting on a different location from the admin who made the booking. Set the filter to All Locations and check the day again. See Using the Locations Filter.
Check whether unattended appointments are hidden. Select the three vertical dots in the calendar toolbar. If the menu reads Show unattended appointments, unattended appointments are currently hidden for that person. That covers the Cancelled, Late Cancellation, Rescheduled and No Show statuses, so an appointment in any of those statuses is invisible to them and visible to a colleague who has the setting the other way. Select Show unattended appointments and look again. This setting is also per person and per browser.
Refresh the calendar. The calendar doesn’t update on its own. If the practitioner already had the calendar open when someone else created or moved the appointment, it won’t appear until the view is refreshed. Select the refresh button (two circular arrows) in the calendar toolbar, or reload the page.
If they’re viewing All Practitioners or a group, open their own calendar instead. In the All Practitioners or group view, a practitioner is only included on days they have availability set, and their appointments come with them. So an appointment booked on a day the practitioner has no availability for the selected location won’t show in that view. Select that practitioner in the Practitioners Filter to view their calendar on its own: with the Locations Filter on All Locations, that view shows all of their appointments regardless of availability. See Using the Locations Filter for how the two filters combine.
Confirm the practitioner and date on the appointment itself. Open the appointment from an account that can see it and check the When & Where section. If it’s booked with a different practitioner, or on a different date from the one being checked, it will be sitting in that column instead.
User permissions aren’t the cause here. Access all Calendars and Show All Appointments control whether a user can see other practitioners’ calendars and appointment details. Neither affects a practitioner’s ability to see an appointment booked with them.
If it’s still missing after all of these, send us the details. Contact Zanda Support with the client, practitioner, location, date and time of the appointment, which users can see it and which can’t, and what the Locations Filter and Practitioners Filter were set to for the person who can’t. That’ll let us trace the view against your account.
An Appointment Is Visible But Shows No Client Details
If you can see a booked appointment on a colleague’s calendar, but the block itself is blank, with no client name and no other details, this is usually a permissions difference, not a problem with the booking.
Seeing full appointment details on a calendar that isn’t your own requires the Show All Appointments permission. Without it, you can still see that a time slot is booked, but the appointment block is intentionally left blank to protect client details you’re not permitted to view.
To check or change this:
- Go to User Menu > Account Settings > Team, and open the relevant practitioner’s profile.
- Open the Permissions tab.
- Check whether Show All Appointments is turned on (and Access all Calendars, if the calendar can’t be opened at all).
- Ask your account administrator or practice manager to enable it if you need to see appointment details across the practice.
[SCREENSHOT PLACEHOLDER: Practitioner Permissions Tab] Show a practitioner’s profile under Team, with the Permissions tab open and the Show All Appointments and Access all Calendars toggles visible.
This is different from an appointment being missing from the calendar entirely. See If an Appointment Is Missing From One Person’s Calendar above for that case.
Editing an Existing Appointment
You can reschedule an existing appointment or edit its information.
The client linked to an existing client appointment is set when the appointment is created. If the appointment was created for the wrong client, create a new appointment for the correct client, then review and delete the original appointment if it is no longer needed.
Here’s how:
-
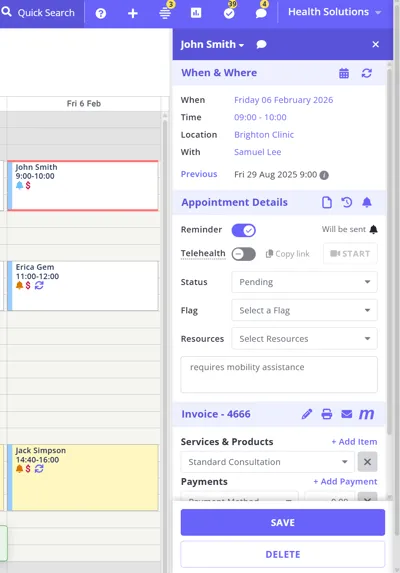
On the Calendar page, click on the appointment you want to edit. This will put a red box around the selected appointment and open the Appointment Settings Panel.
-
The Appointment Settings Panel is divided into three sections:
- When & Where,
- Appointment Details and
- Invoice.
In the When & Where section, you have the option to reschedule the appointment, modify its location, or assign a different health professional to it. For one-off practitioner location changes that only affect an existing appointment, updating the appointment location here is usually simpler than changing availability. Additionally, you can update the appointment status, add flags and notes, as well as revise the amounts, services, and products detailed in the appointment invoice.
If you set a future-dated appointment to Cancelled or Late Cancellation and an Appointment Cancellation Template is configured under Account Settings > Communication > Reminders, the client is notified of the cancellation automatically. See Configuring Appointment Reminders.
- After making the changes, click Save. This will apply the edits to the appointment.
Once you update the appointment date and save your changes, a confirmation message will appear with a ‘View in Calendar’ link. Click this link to quickly access the updated appointment within the actual date on the calendar view.
User Pro Tips:
- Appointment Comments:
- The Appointment Comments section allows you to note logistical details (e.g. “mobility assistance needed”) or the specific Episode of Care associated with the appointment.
- Note: These comments are copied when an appointment is duplicated.
- For clinical records of the session that shouldn’t carry over, use Session Notes instead.
- The character limit for one appointment comment is 2000 characters.
-
Any notes entered by clients in the client portal prior to booking will automatically appear in the appointment comments section within the appointment panel.
-
When you modify the original Service, Pack, or Product, or add additional items to an existing appointment, the Appointment Duration and Time will not be updated automatically. If adjustments to the duration or time are necessary, please manually update the Time in the When & Where section of the Appointment Panel. This applies to editing only. On a new appointment the service does set the length, including a service booked through a session pack, as described in Creating a New Appointment above.
-
You can mark the appointment as ‘Rescheduled’ in the appointment panel while keeping it in its original time slot. Then, create a new appointment in the desired time slot. This approach allows you to maintain a clear history of the original appointment. Additionally, marking the appointment as ‘Rescheduled’ frees up the original time slot, making it available for your team to create a new appointment or for clients to book online.
-
Reschedule an appointment by dragging and dropping it on the appropriate time-slot in the calendar. Here’s how:
- To change the date or time of the appointment, drag it with your mouse cursor to the new time-slot.
- To increase or decrease the appointment duration, drag the top or bottom edges of the appointment up and down until it occupies the time-slot you want.
Understanding Appointment Clashes and Locations
Zanda checks appointment clashes by practitioner and time. If the same practitioner already has an active appointment that overlaps the time you are saving, Zanda treats it as an appointment clash even when the appointment location is different.
Zanda does not block you from creating a clashing appointment. When you create a new appointment from the calendar, it saves even if it overlaps another appointment for the same practitioner. When you edit an existing appointment into a clashing time, Zanda saves the change and shows an Appointment Clash warning so you can review the calendar before leaving the booking in place. Because a clash won’t stop a new appointment from saving, a clash is not the reason an appointment failed to appear on your calendar.
To avoid double bookings across locations, check the practitioner’s calendar column before saving and use the Location field to record where the appointment takes place. For online bookings, keep practitioner availability and location settings aligned so clients are only offered times that match how your practice works.
Booking a session that two practitioners attend
An appointment holds one practitioner, so a single booking cannot appear on two practitioners’ calendars at once. There is no co-practitioner or second-practitioner field on an appointment. Group appointments do not change this either: they let one practitioner see several clients in one booking, not several practitioners see one client. See Creating, Editing and Managing Group Appointments.
The invoice follows the appointment. Once an invoice is linked to an appointment, its practitioner is taken from that appointment and cannot be changed on the invoice itself, and individual invoice lines are not attributed to different practitioners.
If two clinicians deliver a session together, for example a joint assessment, here is how to record it and still bill the client once:
- Book the appointment under one practitioner. Choose the practitioner who should hold the booking and the invoice. The single invoice this creates covers the whole session. If each clinician’s contribution needs to show separately on the bill, add a line item for each on that same invoice rather than creating a second invoice.
- Give the second clinician access to the client’s records. On the client profile, go to Admin > Manage and add them in the Assigned Practitioners field. With the Clinical access level on their user profile, this gives them access to everything under Records on that profile: clinical notes, forms, files, and correspondence. See Assigning Multiple Practitioners to a Client Profile and Managing Users.
- Record both clinicians’ input in the session note. Both can contribute to the same note, one at a time. See Multiple Practitioners Sharing a Session Note in Creating and Managing Session Notes for how to avoid overwriting each other’s entries.
- Block the second clinician’s calendar. Create a personal appointment on their calendar for the same time, so nobody else books them and the slot closes for online bookings. Give it a title your team will recognize, such as “Joint assessment,” and leave client details out of it: the clinical record belongs on the client’s profile, not on a personal appointment.
Note: Step 4 is the one case where a personal appointment is the right tool for client-related time. Personal appointments are normally for time that is not client-related, and the guidance there is to create an invoice without appointment when the time is client-related and billable. Here, the second clinician’s time is already billed on the session’s single invoice, so there is nothing further to bill, and the personal appointment is only blocking their calendar.
Note: Reporting follows the booking. The session is attributed to the appointment’s practitioner only, so it counts toward that practitioner in the Practitioner Utilization Report and shows only their name under Provided By on a client statement. The second clinician’s time does not appear against them in either place.
Duplicating an Appointment
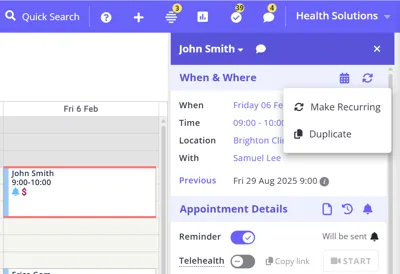
You can easily copy an existing appointment to create a new one with the same details including services, participants, and resources. Read more about Duplicating Appointments here.
Deleting an Appointment
There are two ways to delete an appointment from the calendar:
Option 1
-
On the Calendar page, click on the appointment you want to delete. This will open the booking panel.
-
Scroll down to the very bottom of the booking panel and click Delete below the Save button.
Option 2:
-
Locate the appointment block on the calendar screen and right click it to open its context menu.
-
Click Delete Appointment.
💡 Note: The Delete button is only visible if your account has the Delete Appointments permission enabled (found under Scheduling permissions in User Menu at the top - right > Account Settings > Team > Users). If you do not see a Delete button, contact your account’s master user to enable this permission.
What happens to the invoice when you delete an appointment
Deleting a client appointment also deletes the invoice attached to it. Zanda checks that invoice before it changes anything, so if something on the invoice prevents deletion, your appointment is left exactly as it was and a message explains why.
Two things stop an appointment from being deleted:
- A payment is recorded on the invoice. You will see This invoice has a payment applied and cannot be deleted. Remove the payment and try again. Open the invoice, remove the payment, then delete the appointment.
- An active Medicare claim is attached to the invoice (AUS only). You will see This invoice has a Medicare claim and can not be deleted. What to do next depends on the claim’s status—see the table below.
The confirmation prompt you get before deleting only covers payments and invoices with more than one item, so a Medicare claim blocker appears as a message after you click Delete.
If you delete the appointment, you can restore it later. The invoice, its payments, and any Medicare claims come back with it. See Finding and Restoring Deleted Appointments.
Deleting an appointment with a Medicare claim attached (AUS only)
A claim that has already been sent to Medicare cannot be deleted from Tools > Medicare—that is expected, and for a rejected claim it does not matter, because a rejected claim does not stop you deleting the appointment.
| Claim status | Can you delete the appointment? | What to do |
|---|---|---|
| Rejected | Yes | Delete the appointment as normal. The invoice and the rejected claim are deleted with it. You do not need to remove the claim first, and you will not be able to. |
| Deleted | Yes | Delete the appointment as normal. |
| Prepared | Not yet | The claim has not been sent to Medicare yet, so you can delete it: go to Tools > Medicare, open the claim, and click Delete. Then delete the appointment. |
| Assessed (patient claim, same day it was lodged) | Not yet | Use Same Day Delete: go to Tools > Medicare, open the patient claim, click Delete and choose a reason. The claim moves to Deleted, and you can then delete the appointment. Note this cancels the client’s rebate. See Medicare Claim Statuses . |
| Assessed (any later day), Pended, Pendable, Referred | No | The claim has been sent and cannot be deleted, so the invoice and appointment stay in your account. Write the invoice off and keep it as a null invoice, and set the appointment status to Cancelled rather than deleting it. Writing off the invoice does not correct the claim itself, so if the client still needs their Medicare rebate, see Medicare Claim Statuses for how to contact Medicare directly. |
Viewing Appointment Log
The Appointment Log records all the changes that were made to the appointment. It records the user details, date, time and the nature of the update.
To view the Appointment Log,
- Click the appointment block on the Calendar display to open the Appointment Panel.
- In the Appointment Details section, click on the Show Appointment Log
 icon (a circular arrow with clock arms inside).
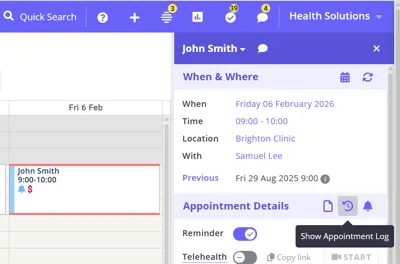
- View the Appointment Log entries.
Frequently Asked Questions
Can I change an existing appointment to a different appointment type?
No. After an appointment has been created, use the appointment panel to update the details for its current type, such as the date, time, location, practitioner, status, flags, notes, invoice items, and appointment-specific details. To use a different appointment type, create a new appointment and select Client, Personal, or Group before saving, then delete the original appointment if it is no longer needed.
Does the Minimum Gap Between Bookings setting apply to appointments I create myself?
No. Minimum Gap Between Bookings applies only to appointments a client books for themselves through the Client Portal, so it does not add a buffer to appointments you create directly on the calendar.
When you create an appointment manually, Zanda does not add a gap automatically. If you want space between two appointments, build the gap in yourself: choose a start time for the new appointment that leaves the buffer you need after the one before it.
Why was no invoice created for my appointment?
There are two reasons. If the appointment isn’t on the calendar either, the appointment itself didn’t save—the appointment and its invoice are created together, so see If an Appointment Doesn’t Save above. If the appointment did save but has no invoice, check that a Service or Pack is selected on the appointment: an appointment saved without one doesn’t generate an invoice. Add the service and save again.
Can I cancel a week of appointments all at once?
Appointments are cancelled one at a time, so for a closure or a period of leave you have two ways to handle the clients. Which one you choose decides the order you work in.
Option A: let Zanda notify each client as you cancel. Right-click each appointment on the Calendar and set it to Cancelled or Late Cancellation. If you have set an Appointment Cancellation Template under Account Settings > Communication > Reminders, each client is notified automatically as you go, so there is nothing to send by hand. See Configuring Appointment Reminders.
Option B: write one message yourself, then cancel. Go to Tools > Communication > Bulk Send, choose your SMS or email template, click Add Recipients, and in the Appointments section set Had an Appointment Between to the dates you are closing. The filter works for future dates, so it reaches everyone booked for the rest of the week without opening a single client profile. Review the recipient list, click Send Message, and cancel the appointments afterwards. SMS fees apply to bulk SMS. See Sending Bulk Communications.
⚠️ Send the bulk message before you cancel. The Had an Appointment Between filter skips appointments that are Cancelled, Late Cancelled, No Show, or Rescheduled. If you cancel first and then build your recipient list, those clients are no longer matched and the message reaches nobody.
If the appointments are part of a recurring series, you can remove the remaining bookings in one step. Right-click an appointment, choose Delete Appointment, and in the Delete Recurring Appointment window select This & All Following or All Appointments. Deleting does not set the appointments to Cancelled, so no cancellation message is sent and the deleted appointments no longer match the Bulk Send filter either. Message those clients first, then delete. See Creating, Editing and Deleting Recurring Appointments.
To stop new bookings landing in the same period, block the time out on your calendar as well. See Setting Availability: Tips and Tricks.
Can I delete an appointment when its Medicare claim failed?
Yes. A failed or unsuccessful claim is one with the status Rejected, and a rejected claim does not block deletion. Delete the appointment the usual way and the invoice and the rejected claim are deleted with it. Rejected claims cannot be removed from the Medicare screen, so there is nothing to tidy up there first.
My client has no sessions left on their referral. Does that change whether I can delete the appointment?
No. A referral that has expired or has no sessions remaining makes no difference to deleting an appointment. Only the status of the Medicare claim on the linked invoice, and whether a payment has been recorded, decide whether the appointment can be deleted.
If I delete an appointment, does it still appear in a client’s records or data export?
Deleting an appointment doesn’t erase it. Zanda keeps the deleted appointment, along with a log of when it was deleted and by which user. You can find it and restore it at any time from the Deleted Appointments report, or from the client’s profile with Show Deleted turned on. See Finding and Restoring Deleted Appointments.
Deleted appointments are, however, left out of the exports you would normally use to put together a client’s appointment history:
- Tools > Data Export: the Client Appointments.csv file includes only appointments that haven’t been deleted. This applies to every export type, including Data Linked to Specific Client.
- Export Appointments report: lists only appointments that haven’t been deleted.
Session notes written for an appointment aren’t deleted when you delete the appointment. They stay on the client’s profile.
If you’re preparing a client’s records, for example in response to their request for a copy of their information, and you need their deleted appointments included, you have two options:
- Restore those appointments first, then run the export. A restored appointment counts toward the Starter plan’s lifetime appointment limit again.
- Run the Deleted Appointments report for the same dates and provide it alongside the export.
What a response to a records request has to include depends on the privacy rules that apply to your practice.