
Recording a new sale without an appointment
- Go to Billing > New Invoice. This opens a small pop-up window; you don’t leave the page you’re on until you’ve chosen a client. The Billing menu also contains New Payment, Invoices, Insurance (or Claims, depending on your region), and Payments.
- In the “Services and Products Provided To” field, type and then select the client’s name.
- Select the correct name from the “Sold By” list, for reporting and cash balancing purposes.
- If the client has a default insurer on their profile, an Insurance row appears, one for each default insurer. Use the drop-down to switch to another insurer already on the client’s file, click the + icon (“Add new client insurance”) to add a new insurer to the client’s profile, or click the red x (“Remove”) to take the insurer off this invoice.
- Select who will pay the invoice under “Who Will Pay This Invoice?” (Client, Client’s Contact or Third Party). This defaults to the client you selected above; change it if a third party, such as an employer, insurer, or other organization, is paying instead. A link next to the field lets you create a new third party without leaving the window.
- Select the Location (this will be linked to the default location).
- Click “Create Invoice”.
- You can now add products, services and payments to the invoice and print or email it as normal. You can also view this invoice at any time by going to the client’s profile and navigating to Client Profile > Billing > Invoices, or by going to Billing > Invoices on the main menu on the left.
You can also use the Quick Actions option via the ➕ icon at the top toolbar and select Invoice to quickly create a new invoice. You may choose to link it to an appointment or leave it as a standalone invoice.
Validation and things to know
- No client selected: “The Client field is required.” You can’t submit the window without picking a client.
- No default location configured for your practice: “Default Location required. Please specify the default account location by going to Setup> Configuration> Locations and ticking ‘Default’.” Ask your practice administrator to set a default location under Setup > Configuration > Locations if you see this.
- Taking an insurer off this invoice: use the red x next to the Insurance field. Don’t set the drop-down back to Select Insurer… and click Create Invoice; an insurance row with no insurer chosen can’t be submitted, and instead of creating the invoice the page returns “We’re experiencing technical difficulties. Please try again later.” Nothing is saved when this happens. Reopen Billing > New Invoice, fill the window in again, and use the red x to clear the insurer. This isn’t caused by your browser, device, or the mobile app, so clearing your cache or switching browsers won’t change it.
- Creating a new invoice does not automatically add any items; you always add at least one item afterward on the invoice editor before it represents an actual charge.
- If the client you searched for doesn’t exist yet, typing a new name and continuing will create a new client record for you automatically.
Permissions required
Creating an invoice requires both of the following permissions on your user account:
- “Access Client Invoices and Payments” (“Allows the user to view the client’s invoice and payment history.”)
- “Edit Appointments: Invoice Charges” (“If this is granted the user can see the invoices’ charges.”)
Without the first permission, the entire Billing menu (including New Invoice) won’t appear for you at all.
Creating an invoice without appointment in a profile
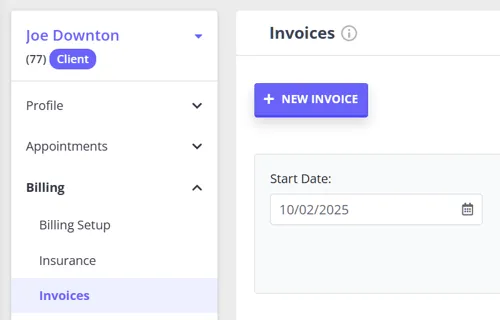
Invoices not attached to appointments can also be created in the client’s invoices list.
- When viewing the client’s invoices in Billing > Invoices, click “+New Invoice”
-
An invoice that is not attached to an appointment will be created.
-
Add a service, pack or product as an Item Line and save the changes.
You will be able to print, download or email this invoice to the client and/or payee.
Creating a quote
To prepare a quote in Zanda, use a standalone invoice rather than a separate quote record. Create a quote product or service item, share the invoice as the quote document, and then keep a PDF copy for your records before deleting the invoice so it does not affect the account balance.
- In User Menu > Account Settings > Billing > Products create a product template named ‘Quote’, add additional information in the product description.
- If you need to take into account the duration of the services the quote is for, you can create a service template with a standard duration in User Menu > Account Settings > Billing > Services. Also name it ‘Quote’, add its description and duration.
- To create a quote, go to Billing > New Invoice or a client profile > Billing > Invoices and create a new invoice.
- Select the ‘Quote’ product or service as the item line.
- Add more information, such as the description, price, and tax, to the item and save the changes.
- Print or email the invoice to the recipient.
- Download a PDF copy of the invoice and upload it in the client’s profile > Records > Files or Admin > Admin Files for your internal records.
- Delete the invoice so that it does not create an outstanding account balance.
Frequently asked questions
Can I create a quote in Zanda?
Yes. Use the standalone invoice workflow in the Creating a quote section above to prepare the quote document, then save a PDF copy and delete the invoice so it does not create an outstanding balance.
How do I record billable admin time or non-face-to-face client work?
Create an invoice without an appointment when you need to bill a client for work that is not tied to a calendar appointment, such as report writing, phone calls, or other client-related admin time. Add the relevant service, pack, or product as an item line, then print, download, email, or record payment for the invoice as usual. If you also need to block time in your calendar, create a separate personal appointment for that time block; the personal appointment manages calendar availability, while the invoice is the client-linked billing record.
This work is billed under the client without counting towards Booked Hours in the Practitioner Utilization Report, because the invoice is not attached to an appointment. A personal appointment does not count towards Booked Hours either, but it does not reduce Available Hours, so that time is reported as Unutilised.
Do I need to add invoice items right away?
No. Creating the invoice just gives you a blank invoice for the client. You add the actual services/products afterward, on the invoice editor that opens automatically.
Will this create a duplicate invoice if the client already has an appointment booked?
Yes. Those invoices are created automatically when you add a service to the appointment. Use New Invoice for sales that aren’t tied to an appointment.
Can I bill someone other than the client?
Yes. Use the Who Will Pay This Invoice? field to select a third party instead of the client themselves. If the third party doesn’t exist yet, you can create one right from the same window.
How do I stop an insurer such as Medicare pre-filling on new invoices?
The Insurance row appears because that insurer is set as a default on the client’s profile.
- For one client: open the client’s profile, go to Billing > Insurance, open the insurance record and switch Default off (tooltip: “This will automatically select this insurer for all new invoices for this client.”). If the client never bills through that insurer, remove the record instead; removed records are no longer active and aren’t picked up as defaults for new invoices.
- For clients you add from now on: go to User Menu > Account Settings > Team > Practitioners > [practitioner] > Insurers, open the insurer and untick Default For All Clients. This only changes what happens for clients created after the change. Clients already on your account keep the default they were given, so clear those on the client profile as above.
Why do I see “PractitionerId … was not found” when creating an invoice?
This means the practitioner selected in the “Sold By” field isn’t active in your account. To fix it:
- Go to User Menu > Account Settings > Teams > Practitioners and open that practitioner’s profile.
- Check the Active toggle at the top-right of the profile—turn it on if it’s off. See Adding and Editing Practitioners for details on activating and deactivating practitioners.
- Confirm the practitioner is part of the same Zanda account you’re creating the invoice in—a practitioner belonging to a different account produces the same error.
- If you just changed the practitioner’s status (or made the change in another browser tab), refresh the New Invoice page before creating the invoice—the practitioner list only loads when the page first opens, so a page left open beforehand can still show a practitioner who is no longer active.