
How to record a new payment
New Payment is the fast path for recording a payment from any client without first navigating to their profile. You’ll find it in the main navigation under Billing > New Payment.
Where to find it
Open the Billing menu and select New Payment. The Billing menu also contains New Invoice, Invoices, Insurance (or Claims, depending on your region), and Payments.
Tip: This is the same New Payment button you’ll see at the top of the Payments report; both take you through the exact same flow described below.
Recording the payment
- Click New Payment. A pop-up window titled New Payment asks “Who is the payment from?”; search for and select the client (or company, contact, or other profile type) the payment is from. Once selected, you’re taken straight to a payment form for that client.
- Fill in the payment form: Date Received (defaults to today), Method, Amount, Location, Notes, and Paid By (US practices only, Client or Insurer).
- Choose the Method the payment was made with. If your practice processes card payments through Stripe or Tyro, selecting one of those methods opens a secure card or terminal dialog instead of saving through the fields above; see Processing Card Payments Using Stripe and Processing a Payment with Tyro Health (AUS only) for those flows in full.
- Click SAVE CHANGES.
Allocating the payment to invoices
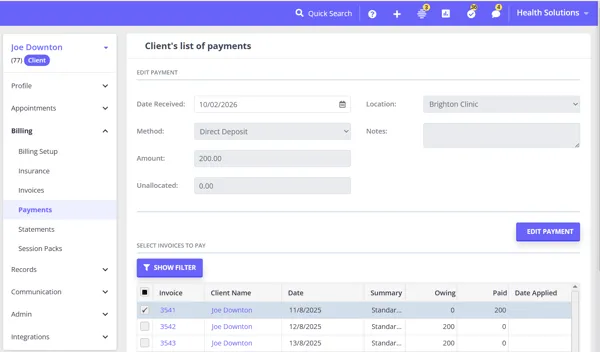
After saving, the page relabels itself Edit Payment, the basic details you just entered become read-only, and a new section appears: Select invoices to pay. This is where you decide which of the client’s unpaid invoices this payment should be applied to.
- Click Show Filter to narrow the list of unpaid invoices by Start Date, End Date, Practitioner (defaults to All Practitioners…), or Statement (defaults to All Statements…), then click Update invoice list.
- The grid shows each unpaid invoice’s Invoice number, Client Name, Date, Summary, and amount Owing.
- Tick a row’s checkbox to allocate the full remaining balance of that invoice, or type directly into the Paid column to allocate a specific (including partial) amount; you can also set the Date Applied for that allocation.
- You can split one payment across several invoices this way, as covered in more detail in How to Apply a Bulk Payment to Multiple Invoices below. If the payment amount is more than what you’ve allocated, the leftover shows in the Unallocated field on the payment; it isn’t lost, it’s held as a credit on the client’s account until you (or they) apply it to a future invoice.
- Once you’ve made changes, a You have unsaved changes label appears; click the Save button at the bottom to confirm the allocations.
- Need to change the amount, method, date, location, or notes afterward? Click Edit Payment to unlock those fields again (this temporarily hides the invoice-allocation grid while you make changes).
Validation and things to know
- No payment method selected: “Payment method is required.” You need to choose a Method before you can save.
- Amount out of range: “Amount must be between -99999999.99 and 99999999.99”
- Zero or negative amount: “The payment amount must be greater than zero.” Adding a payment from an invoice takes a different route and does accept a negative amount, which is how the credit-transfer method in How Can I Transfer an Erroneous Payment Between Clients works.
- Allocating more than the payment amount: “The amount allocated cannot be greater than the new amount.” The total you allocate across a client’s invoices can never exceed the payment’s Amount.
- This flow doesn’t include a way to print or email a receipt directly. To give the client a receipt, print or email the invoice the payment is applied to, or, for a payment that isn’t allocated to an invoice yet, see Printing a Receipt That Shows What an Unallocated Payment Was For below.
Permissions required
Recording a payment requires the Access Client Invoices and Payments permission on your user account (“Allows the user to view the client’s invoice and payment history.”). Without it, the entire Billing menu, including New Payment, won’t appear for you at all.
How to Add a New Client Payment to an Invoice
- Adding a new payment to an invoice is easy. Here’s how:
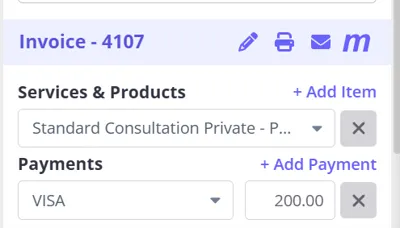
- If you haven’t already, create an appointment with your client in your Zanda calendar.
- Click on the appointment you just created to open the Appointments Panel. Scroll to the bottom until you see the Invoice section. Here, simply choose a Service/Product or Session Pack you’d like to add to your invoice. To add multiple services/products click the +Add Item button.
- Click on the +Add Payment button and choose your desired payment method. The full amount of the Service/Product will automatically apply, then click Save. You can add multiple payments to an invoice using this method.
Hint 💡If you’d like to process payments through Stripe, set it up by going to Account Settings → Payments → Stripe on your Zanda dashboard.
- That’s it. By following these three steps, Zanda will automatically create an invoice and add one or more payments.
To see what the invoice looks like, click on the Printer icon to view/download it as a PDF.
You can also add payments by clicking on the pencil icon on the Invoice section of a particular appointment.
- On the Edit Invoice page, scroll down until you see a +Add Payment button and add your desired payments to your client’s invoice.
Account balance timing for future appointments: If the appointment is scheduled for a future date, the payment can reduce the Owing amount on that appointment invoice straight away, but the invoice will only appear in the client’s Account Balance after the appointment start time. To review future invoices before then, open Profile > Billing > Invoices, clear the End Date field, and click Search.
How to Unallocate Payments from an Invoice
There may be times when you need to unallocate payments from an existing invoice and transfer them to another invoice. This works for Stripe, Tyro, and Tyro HealthPoint payments too. You can’t edit or delete those payments, but you can change which invoice they are applied to from the payment itself.
-
If a client inadvertently overpaid for their initial appointment
You might want to transfer a portion of that payment from the first appointment invoice to the invoice for their subsequent appointment.
Here’s how to do that:
- Navigate to the client’s profile > Billing > Payments, ensuring the payment is within the date range.
Payment not listed here? If the payment appears on the invoice but not on this page, the invoice is billed to a payee through the Payable By field, and the payment sits on that payee’s profile. See The payment is on the invoice but it is not on the client’s Payments page in the Frequently Asked Questions below.
-
Click on the payment date, or click on the gear icon and then Edit Payment.
-
You’ll be presented with a table of invoices for each session of that client, where you can untick and choose another invoice to put the payment toward.
-
Remove the check from the box next the the paid invoice.
-
Check it again - this time the system will allocate the correct amount.
-
Check another invoice to allocate the credit amount.
-
Save the changes.
-
If a payment needs to be transferred to another invoice for the same client,
- repeat the above steps to locate and open the payment edit page,
- un-check the first invoice and
- check another invoice where this payment needs to be allocated.
- Save the changes.
Tip:
You can also click the Edit Payment button to alter the Amount, Date Received and Method, among others.
How to Allocate an Existing Payment/Account Credit to an Invoice
After un-allocating payments from an invoice, you have the option to retain the remaining balance as a credit on the client’s account for future use. Zanda shows Use Existing Payment only when the client has an active payment with an available Unallocated amount. If the payment is already fully allocated to another invoice, first open the payment from the client’s profile and move the allocation to the correct invoice.
To apply an available credit to a new invoice, follow these straightforward steps:
- Create a new appointment with an invoice.
- On its Invoice section, click Add Payment.
- If the client has an available unallocated payment, you will see the option Use Existing Payment. Select it to use the available amount as a partial payment for this invoice.
If you do not see Use Existing Payment, go to the client’s profile and open Billing > Payments. Check the Unallocated column for the payment. When Unallocated is zero, the payment is already fully applied to another invoice. Open the payment, remove the check from the invoice it should no longer pay, check the correct invoice, and save the changes.
Tip: If you change your mind about allocating a payment to an invoice, you can easily remove it. Just click on the appointment to open the side panel. Scroll down till you see the Invoice section and click the bin icon next to the payment to delete it.
How to Delete a Payment
Sometimes a payment needs to be removed entirely rather than reallocated or edited—for example, you recorded two payments for the same date but only received one. You can delete a payment from the client’s Payments screen.
- Go to Client Profile > Billing > Payments and make sure the payment is within the date range shown.💡 Payment not listed here? If the payment appears on the invoice but not on this page, the invoice is billed to a payee through the Payable By field, and the payment sits on that payee’s profile. Open the payee’s Billing > Payments page to delete it. See The payment is on the invoice but it is not on the client’s Payments page in the Frequently Asked Questions below.
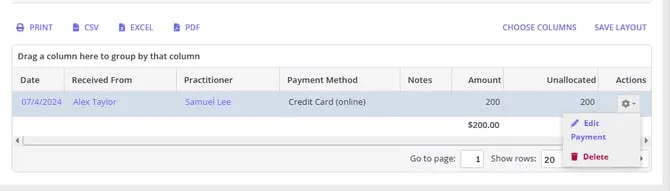
- Find the payment row, click the gear icon, and select Delete (this is a separate action from Edit Payment).
- When Zanda asks you to confirm, select Delete again. The payment is removed and no longer appears on the client’s account.
A payment that was never applied to an invoice—one that shows the full amount in the Unallocated column—can be deleted straight away using these steps.
If the payment is still applied to one or more invoices, unallocate it from every invoice first (see How to Unallocate Payments from an Invoice above), then delete it. Zanda blocks deletion while a payment is still linked to an active invoice.
Stripe, Tyro, and Tyro HealthPoint payments cannot be deleted directly from the payment record. If one of these integrated payments needs to be corrected, contact support.
How to Apply a Bulk Payment to Multiple Invoices
You can quickly apply a single payment to multiple invoices. This is useful if, for example, you had multiple invoices outstanding, and the client made one payment for the total amount. This is how:
-
Go to Billing > New Payment. Alternatively, you can click the ➕ icon at the top toolbar to open the Quick Actions menu, select Payment
-
Enter the name of the relevant Client (or Third Party), which will take you to their Payments page.
-
You will be taken over to the payee profile > Billing > Payments > New Payment page. Enter thePayment Date, Method and Amount and click Save. For ACH or bank-transfer payments received outside Zanda, select the manual payment method your practice uses, such as ACH or Direct Deposit, so the payment is recorded against the invoice.
-
The client’s outstanding invoices will show. Tick the Invoices you’d like to pay and click Save. Done! The payment will be applied across the invoices you selected.
💡 Tip: When a payee has a long list of outstanding invoices, click Show Filter on the payment page to narrow the list by date, practitioner, or statement number before you allocate. See Paying Invoices Using Statement Numbers.
Paying invoices for multiple clients at once
Each payment is entered against a single payee, so the invoice list shows that payee’s own outstanding invoices along with any invoices billed to them through the Payable By field on the invoice.
That means one payment can settle invoices for several clients at once when a shared third party is billed for them, such as an NDIS plan manager, an insurer, or an employer paying on behalf of a group of clients:
-
Go to Billing > New Payment (or click the ➕ icon on the top toolbar and select Payment). You can also open the third party from the quick search and go to Billing > Payments within their profile.
-
Search for the third party and select their profile.
-
Enter the Payment Date, Method, and Amount, then click Save. Back-dated payment dates are supported, which is handy when you are recording payments that were received outside Zanda.
-
Every outstanding invoice billed to that third party appears, across all the clients it covers. Tick the invoices to pay and click Save.
When invoices are billed directly to individual clients rather than a shared third party, record one payment per client, since each payment applies to a single payee.
Tip: This also works with integrated terminal payments. See Splitting a Tyro payment across two clients in Processing a Payment with Tyro Health (AUS only).
Splitting a Payment Between Multiple Payees
In some situations, you may need to list more than one person or a third party as the payee for an invoice — for example:
-
Multiple parents or guardians sharing the cost of a child’s appointment.
-
Split billing between a client and a third-party payer (e.g., insurer, employer, funding body).
How it Works in Zanda
In Zanda, each invoice can only have one primary payee. However, you can still accommodate multiple payers by using one of the following methods:
Option 1: Split the total into separate invoices
-
Create one invoice per payee , each with their portion of the total fee.
-
This allows you to track payments and receipts separately.
💡 Note: You can link one of these invoices to the client’s appointment, and generate other invoice(s) via this client’s profile > Billing > Invoices > New Invoice. When a new invoice is generated, select the payee in the ‘Payable By’ field to bill it to the right payee.
Option 2: Use the ‘Item Description’ and ‘Payment Notes’ fields of the same single invoice
-
Add the details of other contributing payers in the invoice Item Description notes - Useful when you want to acknowledge multiple payers but still issue a single invoice.
-
Share the invoice will all involved parties.
-
When partial payments are received, add them as separate payments. Use each payment’s Notes field to record who paid, for your own records. Payment notes don’t appear on the invoice or receipt, so if the payers need to see who paid what, add it to the invoice Item Description instead.
💡 Note: When entering a partial payment, you have the option to change the ‘Payable By’ field to reflect the specific payee making the payment. This adjustment ensures that the transaction is accurately recorded in the payee’s profile within your Zanda account.
🗒️ Recommended Practices
To ensure smooth transactions and accurate accounting, consider the following best practices:
-
Make sure that the total amounts on all invoices correspond to the overall service cost.
-
Clearly communicate payment expectations to all involved parties to avoid confusion.
-
Maintain detailed payment records for each payer to support accurate accounting and compliance efforts.
Sending a Credit Note to a Client/Payee
If you need to issue a credit note for an overpayment, a simple workaround is to export the payment record from Client Profile > Billing > Payments as a PDF or a spreadsheet file:
For example, this is how this payment details will be displayed on a printed document or a PDF file:
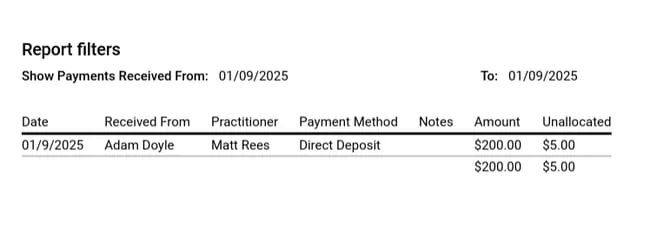
You can then email this file to your client, adding a note to explain that the Unallocated column displays the overpaid amount. This balance will remain on the client’s account and can be applied as an existing payment toward future invoices.
Need the receipt to also show what the payment was for, for example, for a third-party or government requirement? See Printing a Receipt That Shows What an Unallocated Payment Was For below.
Printing a Receipt That Shows What an Unallocated Payment Was For
The credit note export above proves a payment exists, but it doesn’t include a description of what the payment was for. If a client needs that detail on the receipt, for example, to satisfy a third-party or government requirement, use a standalone invoice instead:
- Go to Billing > New Invoice and create a standalone invoice for the same client or payee. Leave it unlinked to an appointment.
- Add a line item and use the Invoice Items Description field to describe what the payment was for, since this text prints on the invoice.
- Click +Add Payment, select Use Existing Payment, and apply the unallocated payment to this invoice.
- Print or email the invoice to the client. It now works as a receipt showing both the payment and its description.
- Once you’re done, move the payment back where it belongs: open the payment, untick this standalone invoice, and tick the invoice it should actually be allocated to (or leave it unallocated).
- Only after the payment has been moved off the standalone invoice, delete the standalone invoice from Billing > Invoices.
Do steps 5 and 6 in that order. If you delete the standalone invoice before reallocating the payment away from it, the payment record is removed along with the invoice.
Frequently Asked Questions
The payment is on the invoice but it is not on the client’s Payments page. Where did it go?
A payment is recorded against the profile the invoice is billed to, not against the client who had the appointment. So when an invoice has a payee in the Payable By field (a contact, another member of a shared profile, or a third party such as an insurer, employer, or plan manager), the payment is stored on that payee’s profile.
The client’s Billing > Invoices page still lists the invoice, with the payee’s name in the Payable By column, and the invoice itself still shows the payment. The client’s Billing > Payments page will not show it. Nothing has been lost, and the date range is not the cause.
Here is how to find the payment and work with it:
- Open the invoice and check the Payable By field to see which profile the payment was recorded against. You can also go to Billing > Payments from the main menu and look for the payment there: the Received From column shows the profile each payment sits on, using the company name for a third party.
- Open that payee’s profile, either through Quick Search, or from the client’s profile Contacts tab by opening the connected contact and clicking View Contact’s Full Profile.
- Go to the payee profile’s Billing > Payments. The payment is listed here, and this is where you edit, reallocate, or delete it.
- When you reallocate it, the invoice list on the payment shows every unpaid invoice for that payee, including invoices billed to them for other clients, so you can move the payment to the right invoice from this one screen.
If this is happening for every new invoice for a client, open the client’s Billing > Billing Setup and check the Bill To field. When Bill To names a contact or third party, Zanda copies that payee onto every new appointment invoice for the client, so every payment for that client is recorded on the payee’s profile from then on. Set Bill To back to the client if you want future payments recorded on the client’s own profile. Payments already recorded stay where they are, and when you save the change Zanda asks whether to also apply the new payee to existing future-dated invoices.
What is the fastest way to process a first client payment?
Start from the invoice you want to collect payment for. Use +Add Payment when you have already received payment and need to record it. Choose Credit Card (online) when you want to process the card through Stripe, or send the client an invoice payment link when they need to pay online themselves.
If you are using Stripe, connect Stripe first. When you send a payment link, the client opens the link, enters their card details, and selects Pay Now.
What should I do if a payment still shows an unallocated amount?
Check whether the unallocated amount is a real remaining balance or a payment link that needs to be updated. If the payment has a remaining balance, create or open the invoice you want to use it on, click +Add Payment, and select Use Existing Payment. If the payment is linked to the wrong invoice, open Client Profile > Billing > Payments, edit the payment, remove the invoice tick, choose the correct invoice, and save the changes.
If the payment needs to be deleted rather than reallocated, see How to Delete a Payment above.
How do I carry a payment across when a paid appointment is rescheduled?
When a client has already paid for an appointment and you need to move the payment to a replacement appointment, first mark the original appointment as Rescheduled and create the new appointment in the correct date and time. Add the invoice details to the new appointment so there is an invoice available for the payment.
Then move the existing payment to the new invoice:
-
Go to Client Profile > Billing > Payments.
-
Open the payment by selecting the payment date, or use the gear icon and select Edit Payment.
-
In the invoice table, clear the checkbox for the original appointment invoice.
-
Select the checkbox for the new appointment invoice.
-
Click Save.
This reallocates the existing payment to the new appointment invoice, so you do not need to charge the client again. If you want to leave the payment as account credit first, unallocate it from the original invoice, then use Use Existing Payment from the new appointment invoice.
How do I move a credit from a canceled appointment to a new appointment?
If the credit is an existing payment on the same client’s account, create the new appointment and invoice, then use Add Payment > Use Existing Payment on the new invoice to apply the available amount.
If the payment is still allocated to the canceled appointment’s invoice, first go to Client Profile > Billing > Payments, open the payment, uncheck the canceled appointment invoice, check the new appointment invoice, and save the changes. If the canceled appointment invoice was removed and the payment now shows as unallocated credit, use the existing payment option on the new invoice.
Why is the billing section locked or not letting me add a payment from an appointment?
In the appointment panel, appointment billing appears in the Invoice section for client appointments. If the Invoice section, + Add Payment link, or invoice icons are not available, check that the user has the permissions needed for appointment billing: Edit Appointments, Edit Appointments: Invoice Charges, and Access Client Invoices and Payments.
Users with billing access can also open the invoice from Billing > Invoices or the client profile’s Billing > Invoices page, then use + Add Payment on the invoice edit page. For Stripe payments started from the appointment panel, the user needs appointment-editing access as well as client invoice and payment access.
Do I need to delete the invoice so the payment attaches to a rescheduled appointment?
No. If you edit the existing appointment date or drag the appointment to a new calendar time, keep the existing invoice and payment in place. Zanda updates the same appointment record, and the invoice stays with that appointment.
If you mark the original appointment as Rescheduled and create a separate replacement appointment, first decide whether the original invoice still needs to remain on that original appointment. When the new appointment has its own invoice, unallocate the payment from the original invoice, then allocate the existing payment to the new invoice. This keeps the payment record intact and applies it to the correct appointment invoice.
- Go to the client profile and open Billing > Payments.
- Find the payment and click the payment date, or use the gear icon and select Edit Payment.
- Untick the original invoice to unallocate the payment, then click Save.
- Open the new appointment invoice.
- Click Add Payment and choose the payment from Use Existing Payment.
- Save the invoice.
Why is an invoice missing from the Select invoices to pay list?
The Select invoices to pay grid on a payment only shows unpaid invoices for the selected client, filtered by whatever Start Date, End Date, Practitioner, or Statement filters are applied under Show Filter. If your user account doesn’t have the Access all Calendars permission, the list is also locked to invoices billed under your own practitioner record.