
Important: Logging in with a passkey doesn’t ask for a 2FA code, but you still need to set up 2FA for your Zanda account. 2FA keeps your email and password login secure, and you’ll need it whenever you log in without your passkey, for example on a new device. See Managing 2FA to set it up.
How passkeys work with 2FA
A passkey combines something you have (the passkey, saved on your device, in your password manager, or on a security key) with something you are or know (your fingerprint, face, or PIN). Because one step covers both factors, Zanda does not ask for a 2FA code when you log in with a passkey.
Your passkey is an extra way to log in, alongside your password and 2FA. Set up 2FA first, then add a passkey: 2FA keeps your email and password login secure, and the passkey makes your day-to-day login quicker, with no code to type.
- Logging in with a passkey: no password and no 2FA code.
- Logging in with your email address and password: Zanda asks for your 2FA code. Keep your authenticator app and backup codes, because you need them whenever you log in without your passkey, for example on a new device.
- Setting up 2FA: adding a passkey does not turn 2FA off or count as setting it up. Every user still needs 2FA set up for their email and password login, and 2FA is becoming required for every Zanda user in stages from early November 2026.
See Managing 2FA to set up 2FA, and Zanda Account Security: Passwords, Password Managers, 2FA to learn why passkeys are more secure than a password.
Add a passkey from your User Profile
-
Open your Zanda account, click your account business name in the top-right corner and select User Profile.
-
In the Passkeys row, click Add passkey. If you already have a passkey, click Manage passkeys, then click Add passkey in the dialog.
-
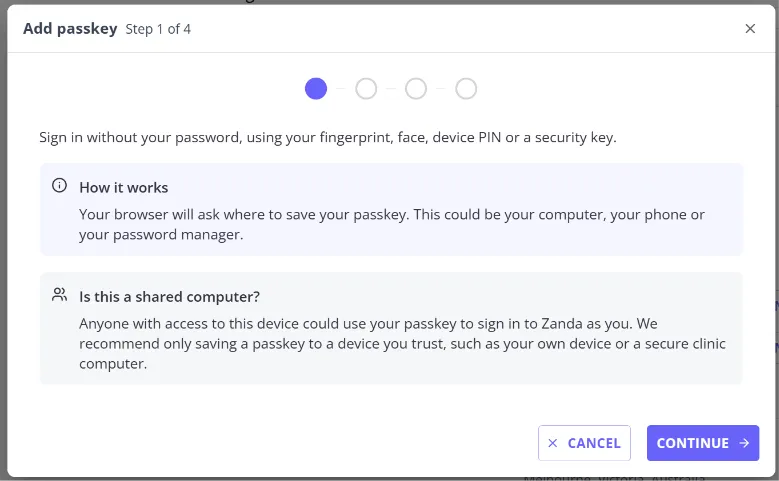
Read the introduction in the Add passkey dialog and click Continue.
-
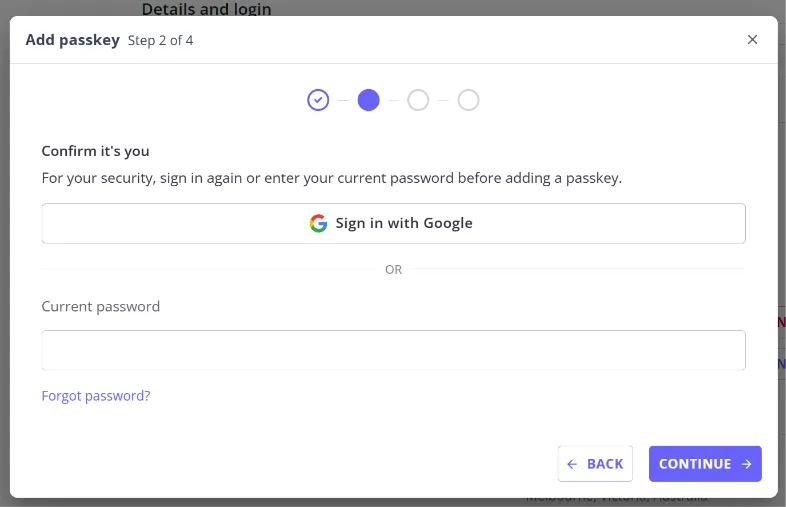
On the Confirm it’s you step, do one of the following:
- Enter your password in the Current password field and click Continue.
- If you’ve linked Google or Microsoft to your Zanda login, click Sign in with Google or Sign in with Microsoft and sign in with that account. These buttons appear only when single sign-on is turned on for your account. If you don’t have a Zanda password, the buttons are your only option on this step.
If you use 2FA, Zanda then asks for the 6-digit code from your authenticator app, whichever way you confirmed: enter it in the Authentication code field and click Continue.
-
On the Follow the prompt from your browser step, your browser asks where to save the passkey, such as your computer, your phone, or your password manager. Choose a location and confirm with your fingerprint, face, or device PIN.
-
On the Name your passkey step, Zanda suggests a name based on where the passkey is saved. Keep it or type a name that tells you where it’s saved, such as “Google account” or “Reception PC”, then click Save.
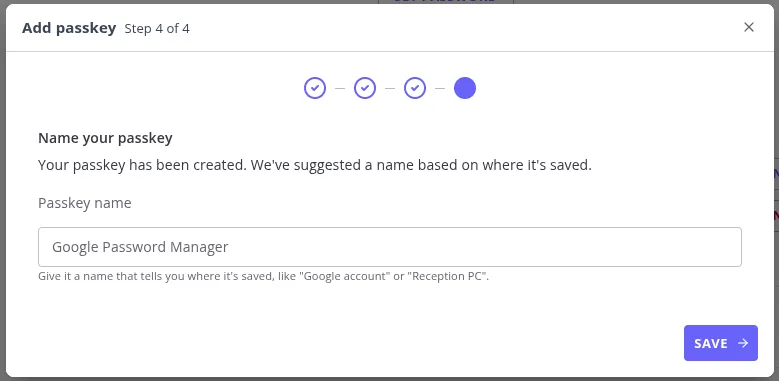
Zanda opens the Manage passkeys dialog, where your new passkey now appears.
Important: Anyone with access to the device where you save a passkey could use it to log in to Zanda as you. Only save a passkey to a device you trust, such as your own device or a secure clinic computer. If you’re not sure, save it to your phone or your password manager instead.
Each time you add a passkey, Zanda asks you to confirm it’s you again. You can save up to 10 passkeys, for example one in your password manager and one on a security key. To save a passkey that works on every device where your password manager is installed, choose your password manager when your browser asks where to save it.
Log in with your passkey
- Go to the Zanda login page for your region.
- Click Sign in with a passkey.
- Your browser shows the passkeys it can use for Zanda. Choose yours and confirm with your fingerprint, face, or device PIN.
Zanda logs you straight in. There is no password to type and no 2FA code to enter.
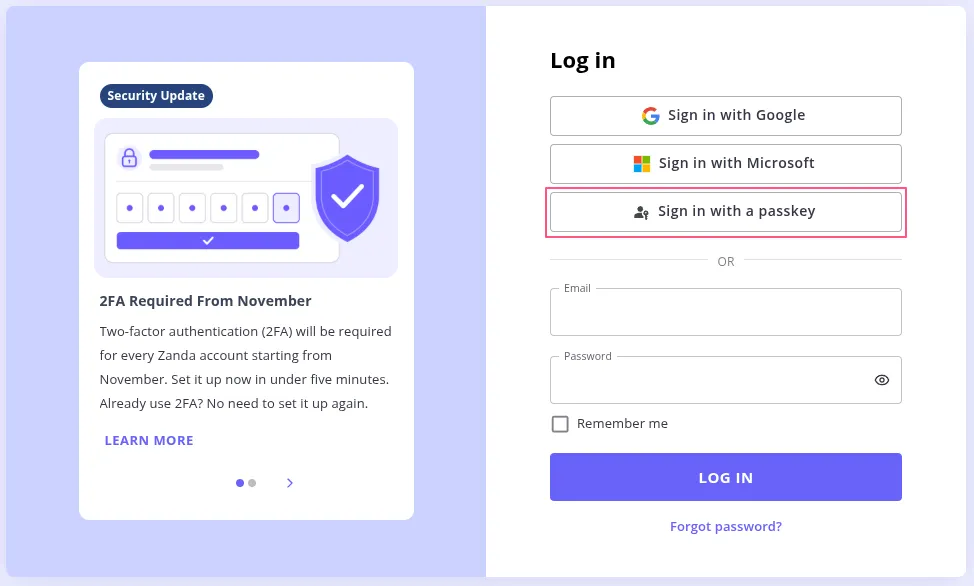
If the browser prompt is closed or times out, click Sign in with a passkey again, or log in with your email address, password, and 2FA code.
Rename or delete a passkey
- Click your account business name in the top-right corner and select User Profile.
- In the Passkeys row, click Manage passkeys.
The Manage passkeys dialog lists each passkey with its Name, Type, Date added, and Last used date, including the browser and device it was last used on. Type shows Synced for a passkey that can sync across your devices, such as one saved in a password manager, and Single device for a passkey that stays on one device or security key.
- To rename a passkey, click the pencil icon next to its name, type the new name, and click the check mark icon to save it.
- To delete a passkey, click Delete in its row, then click Delete passkey to confirm. You can no longer log in to Zanda with that passkey.
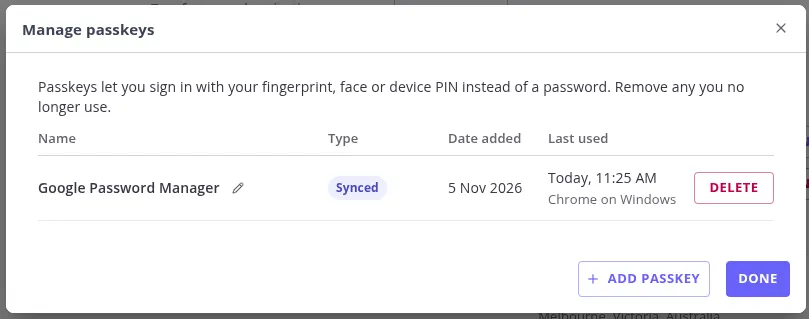
Deleting a passkey in Zanda does not remove it from your device or password manager, so you can delete it there too. After you delete your only passkey, you log in with your password and 2FA code (or with Google or Microsoft, if that is how you sign in) until you add another one.
Remove a team member’s passkeys
If a team member loses a device that holds a passkey, an account administrator can remove that passkey. This option is available to the master user and to users with permission to access the Settings menu.
- Click the Settings cog (top right) > Team > Users > User Management.
- Click the name of the user.
- In the Passkeys row, click Manage passkeys. If the user has no passkeys, the row shows “No passkeys enabled”.
- Click Delete next to the passkey, then click Delete passkey to confirm.
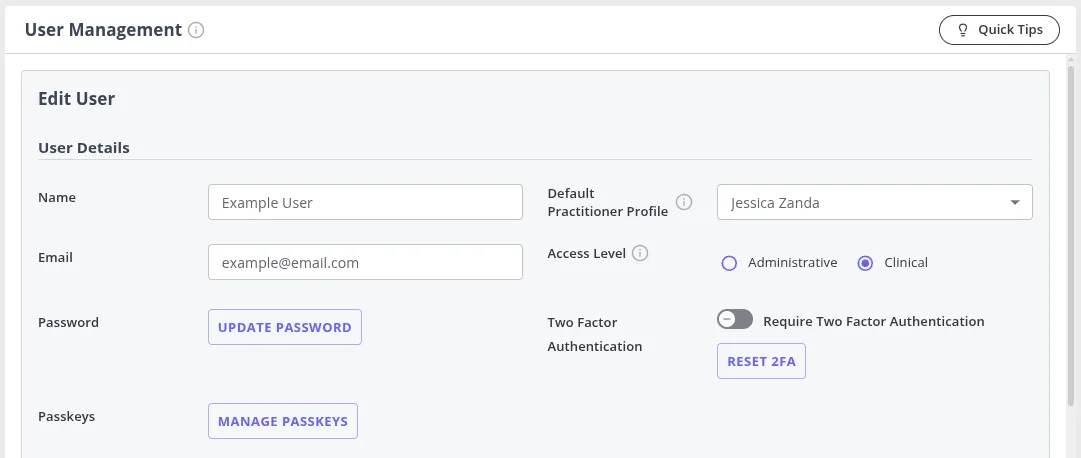
The Passkeys row appears for team members who have accepted their invitation, other than the master user. It is hidden while Allow users to sign in using passkeys is turned off for your account (see Turn passkeys on or off for your account below), so turn the switch back on first if you need to remove a team member’s passkey. To manage your own passkeys, use your User Profile.
Emails when a passkey is added or removed
Zanda sends a security email to the email address on your Zanda login whenever a passkey is added to or removed from your login. Each email shows the Passkey name and the Date and time of the change, in your practice’s time zone, so you can spot a change you didn’t make.
- A passkey is added: about a minute after you add a passkey, you receive “A passkey was added to your Zanda login”. The email shows the name you saved on the Name your passkey step.
- You delete one of your passkeys: you receive “A passkey was removed from your Zanda login”.
- An account administrator removes one of your passkeys: you receive “A passkey was removed from your Zanda login”, worded to say your account administrator removed it. The administrator who removed it doesn’t receive an email.
Renaming a passkey doesn’t send an email, because it doesn’t change how you log in.
If you made the change, you don’t need to do anything. If you receive an email about a passkey you didn’t add or remove yourself, someone else may have access to your account. Act right away:
- Click your account business name in the top-right corner, select User Profile, click Manage passkeys, and delete any passkey you don’t recognize (see Rename or delete a passkey above).
- Select Log out from active sessions to log out everywhere else your account is logged in. See Reviewing your recent logins and managing active sessions.
- Change your password and update your 2FA. See Managing 2FA.
If the email says your account administrator removed a passkey and you weren’t expecting it, check with your account administrator right away.
Turn passkeys on or off for your account
Passkeys are on for every account by default. A master user, or a user with permission to access the Settings menu, can turn them off for everyone on the account:
- Click the Settings cog (top right) > Team > Users and select the User Settings tab.
- Turn the Allow users to sign in using passkeys switch on or off.
- Click Save Changes.
While the switch is off, the Passkeys row disappears from every User Profile and from each team member’s page in User Management, and logging in with a passkey shows “Passkey sign-in isn’t available for your practice. Please sign in using another login method.” Users log in another way instead, such as with their email address, password, and 2FA code. Passkeys saved earlier stay on users’ accounts and work again once the switch is turned back on. See Account User Settings for the other settings on this page.
Frequently Asked Questions
Why don’t I see the Passkeys row on my User Profile?
Ask your master user, or a user with access to the Settings menu, to check that the Allow users to sign in using passkeys switch is on for your account (see Turn passkeys on or off for your account above). The Passkeys row also doesn’t appear while you are logged in on behalf of another user. Log in as yourself to add or manage your own passkeys.
I received an email saying a passkey was added or removed. Is it genuine?
Zanda sends this security email whenever a passkey is added to or removed from your login. Open User Profile > Manage passkeys to check your current passkeys. If you didn’t make the change, follow the steps in Emails when a passkey is added or removed above.
Why does Zanda say “This browser doesn’t support passkeys”?
Your browser doesn’t offer the passkey features Zanda needs. Update your browser to its latest version and try again, or use a different up-to-date browser. Until then, log in with your email address, password, and 2FA code.
Why is the Add passkey button grayed out in the Manage passkeys dialog?
You have reached the maximum of 10 passkeys. Delete a passkey you no longer use (see Rename or delete a passkey above), then add the new one.