
What is the Master User?
The master user is considered the account owner for your Zanda account. The master user has full control over:
- Billing and subscription management
- User access and permissions
- Account settings and data exports
- Integrations and security settings
If ownership changes (for example, someone else should now manage billing and user permissions), you can transfer the master user role to another eligible user—without needing to contact Zanda Support.
Who Can Transfer the Master User Role?
Only the current master user can transfer master user status.
To transfer master user status, both of the following must be true:
- You are currently logged in as the master user.
- There is at least one other active user who has the “Setup and Configure Zanda” permission.
If no such user exists, you won’t be able to complete the transfer yet.
Where to Find the Transfer Option
- Go to User Menu > Account Settings > Team > User > User Management in Zanda.
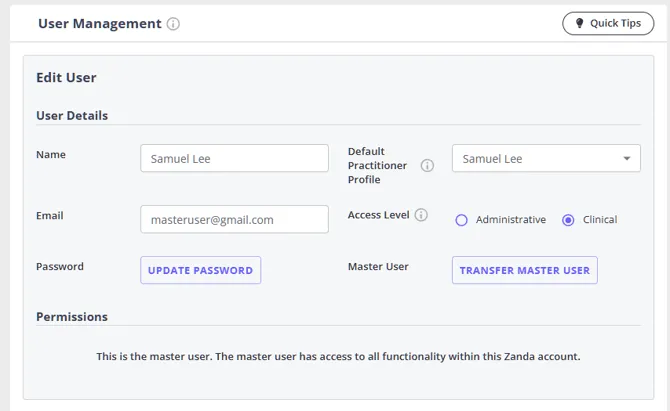
- Open the top user profile in the users list - this will be the master user profile. In their profile settings, look for the Transfer Master User button.
You’ll see one of two ‘Master User - Transfer Master User’ button states:
- Button enabled – The Transfer Master User button looks active, is purple, - You can start the transfer.
- Button disabled - The Transfer Master User button looks deactivated active, is greyed out, - You’ll first need to update another user’s permissions so they have Setup and Configure Zanda, or create a new user with those permissions.
This screenshot demonstrates an active Transfer Master User button which will allow you to start the transfer process.
How to Transfer the Master User Role
The transfer is a guided, multi-step process.
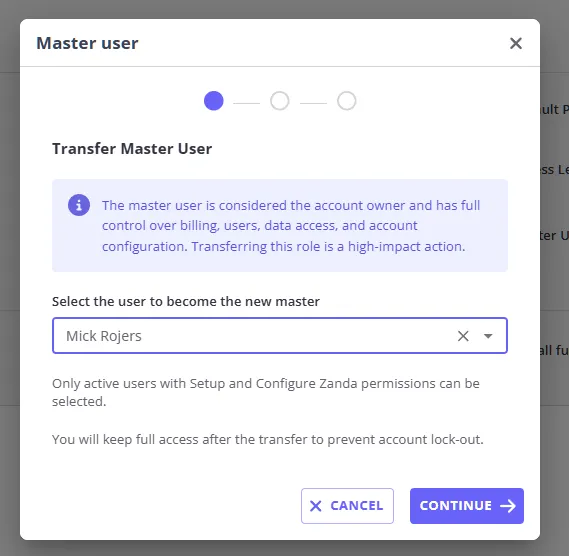
Step 1 – Open the Transfer Master User Modal
- Click Transfer Master User in the Master User section.
- A modal titled Transfer Master User will open.
- Read the information carefully – it explains the impact of changing the master user, including that:
- The master user is considered the account owner.
- The change takes effect immediately once confirmed.
Step 2 – Choose the New Master User
- In the modal, use the dropdown to select the user who should become the new master user.
- Only active users with “Setup and Configure Zanda” permissions will appear in this list.
- After selecting the correct user, click Continue.
You’ll then move to the confirmation step.
Step 3 – Confirm the Transfer
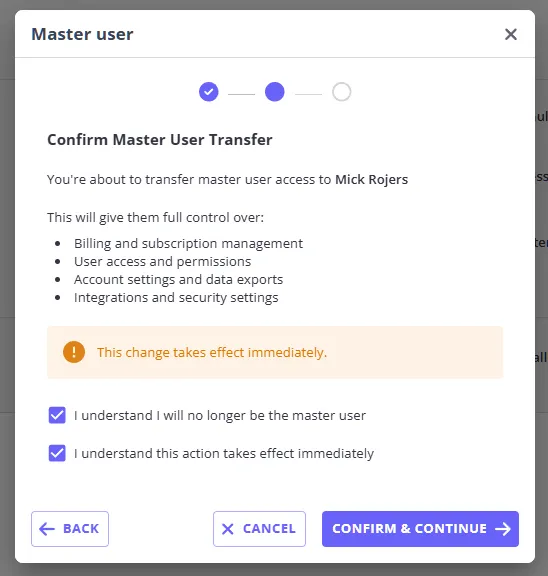
- Review the Confirm Master User Transfer step.
- You’ll see the name of the user you selected, confirming who will become the new master user.
- The screen will clearly state that the change takes effect immediately.
- Read each confirmation statement, then tick all required checkboxes to confirm that you:
- Understand that the new user becomes the account’s master user.
- Understand that the transfer takes effect immediately.
- Any additional confirmations listed on screen.
The Confirm & Continue button will only become available once you’ve ticked all required checkboxes.
- When you’re sure everything is correct, click Confirm & Continue.
Step 4 – Verify Your Identity
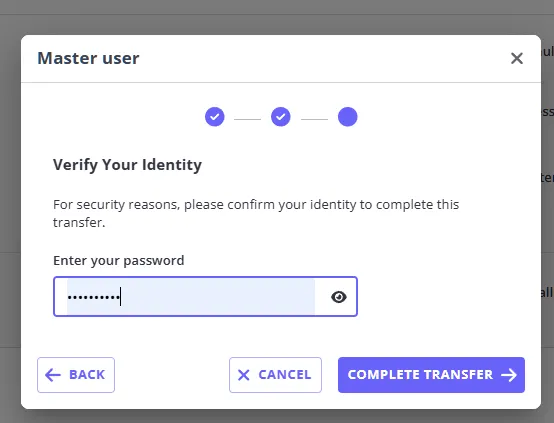
To protect your account, Zanda will ask you to verify your identity before completing the transfer.
Depending on your account security settings, you’ll see one of the following:
- If you have two-factor authentication (2FA) enabled:
- Enter your account password.
- Enter your two-factor authentication code.
- If you don’t have 2FA enabled:
- Enter your account password only.
If the details are incorrect, the transfer won’t proceed and you’ll see an error. Once you enter the correct details, the transfer will complete.
Step 5 – Transfer Complete
When your identity has been successfully verified and the transfer is complete:
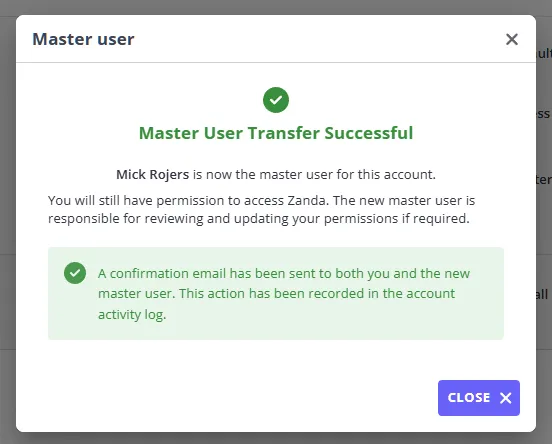
- You’ll see a success message confirming:
- The master user transfer was successful.
- The name of the new master user.
- You can then close the modal.
After you’ve seen the confirmation screen, you’ll be logged out automatically. You can sign in again and continue using Zanda with your updated permissions (see next section).
What Happens to User Permissions After the Transfer?
When you transfer master user status:
- The new master user now has full control over:
- Billing and subscription management
- User access and permissions
- Account settings and data exports
- Integrations and security settings
- You, as the previous master user, will:
- Keep access to your Zanda account.
- Keep permissions such as:
- See all clients
- Access all clients
- Keep all other permissions checked, except:
- “Connect to Own Stripe Account” — this will be turned off for you.
- The new master user can review and adjust your permissions if needed.
Email Notifications Users Will Receive
Once the transfer is successfully completed, both you and the new master user will receive confirmation emails.
Email to the Previous Master User (You)
- Subject: “Master user access transferred”
- Content:
- Confirms that master user access for your Zanda account has been transferred.
- Names the new master user.
- Reminds you that you still have access to Zanda.
- Advises you to contact Zanda Support if you didn’t expect this change.
Email to the New Master User
- Subject: “You are now the master user for your Zanda account”
- Content:
- Confirms they are now the master user.
- Explains their responsibilities (billing, permissions, account settings, etc.).
- Asks them to review your permissions (the previous master user) to ensure they’re correct.
These emails are sent only when the transfer has successfully completed.
Activity Logging
For security and audit purposes, Zanda records successful master user transfers in the activity log in Tools > Log File with an entry similar to: Zanda Master User status transferred to ‘User Name’
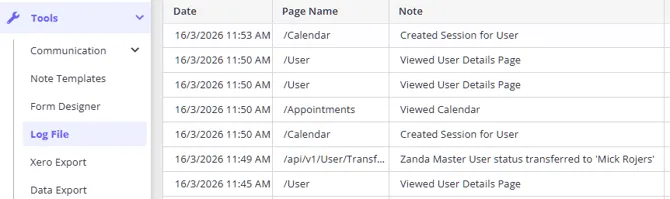
This helps you, your team, and support track who changed what, and when.
Selling or Transferring Practice Ownership Without Changing Accounts
Not every ownership change needs a master user transfer or a move to a new account. If you’re selling your practice to someone who already works there as a practitioner, and they’re happy to keep using the existing Zanda account under its current master user, you can update the account’s business and billing details directly instead.
This differs from both other options:
- Transferring the master user role (described above) keeps the account, business name, and business details exactly as they are; it only changes who is signed in as the account owner.
- Copying data to a new account moves your data into a brand new Zanda account.
Use this approach when the account, business name, and master user are all staying as they are, and only the underlying ownership of the practice is changing.
Update your business details
Go to User Menu > Account Settings > Practice > Business Info and update the business name, ABN/tax ID, address, and contact details to reflect the new ownership.
Caution: Zanda doesn’t store a separate copy of your business name, ABN, address, or bank and direct deposit details on each invoice. All of it, including any bank details entered as custom invoice text, is pulled fresh from your current settings every time an invoice is displayed, printed, emailed, or regenerated. A client’s existing PDF copy of an old invoice stays as it was, but reprinting or re-downloading that same invoice afterwards shows the new details, not what applied when it was originally issued.
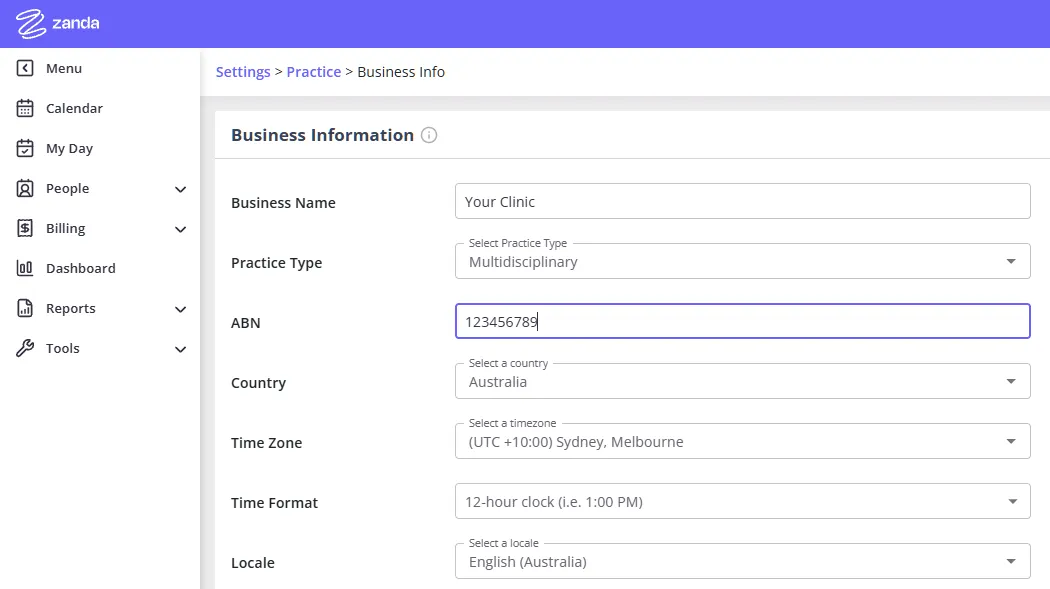
If you’re updating bank or direct deposit details as part of the ownership change, they’re set under User Menu > Account Settings > Billing > Invoices (Custom Text for Invoice Footer), or wherever else you’ve added them, as described in Customising Your Invoices/Receipts. The same live-pull behaviour applies there too, so invoices issued before the change will show the new bank details the next time they’re printed, emailed, or re-downloaded. To preserve a record of what a client saw at the time, download or email a PDF copy of the invoice before making the change.
Reconnect Xero to the new organisation
Go to Tools > Xero Export and connect to the new owner’s Xero organisation. See Managing Integration With Xero for the full connection steps.
Caution: Your bank account, sales account, tracking categories, branding theme, and the payment method used to import reconciled Xero payments are all tied to the specific Xero organisation you’re connected to. Connecting to a different organisation resets all of these (your client privacy export settings are the only thing carried over), so you’ll need to set them again in Xero Settings before invoices and payments will export. Invoices already exported to the previous Xero organisation stay marked as exported in Zanda; they won’t automatically appear in, or resync to, the new organisation. If the new owner needs that pre-sale financial history inside the new Xero organisation too, arrange that directly with your accountant or through Xero, not through the Zanda export tool.
Adjust your invoice numbering
If you want a clean break between the old and new ownership, go to User Menu > Account Settings > Billing > Invoices and update the Last Invoice Number field.
Caution: The Last Invoice Number field isn’t a separate counter. Entering a higher number changes the invoice number stored on whichever invoice is currently your most recent one, and every invoice created after that follows on from the new number. Make this change only once that last invoice has been fully issued, exported, or paid, since its number in Zanda will no longer match any copy already sent out under the old number.
If you’re unsure whether this approach fits your situation, email [email protected] before making changes so a Zanda team member can confirm it’s the right option for what you’re planning.
Need Help?
If you cannot make the necessary changes yourself, see Using the Help Menu for the fastest way to reach our team.