
Setting Up an Appointment Flag and its Colour
Here’s how you can set up a colour flag for an appointment type in Zanda:
-
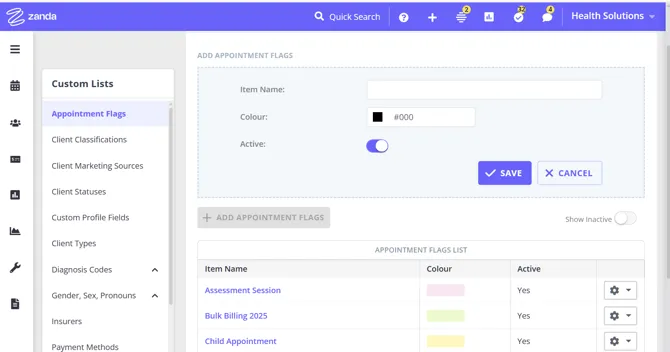
Navigate to User Menu > Account Settings > Schedule > Appointment Flags.
-
Here, you will have an overview of the already existing flags, and create new ones.
-
Click on +Add Appointment Flags.
-
Name your appointment flag, assign a colour to it and switch it to active. Once done, press Save.
-
Your newly created Appointment flag - along with its colour - will show up in the Appointment Flags List.
Tip: Appointment flag colour is a separate system from the colour you can assign to a location. Location colour shades a location’s available time on the calendar; appointment flag colour fills the block of a booked appointment.
How the Appointment Flags List Is Ordered
The Appointment Flags List orders flags automatically: active flags are listed first, then sorted alphabetically by name. When you turn on Show Inactive, inactive flags follow the same rule within their own group. Manual reordering (dragging a flag into a custom position) isn’t supported.
To control where a flag lands in the list, name it accordingly. For example, prefix each flag with a number or letter (1 - Assessment Session, 2 - Follow Up) so they land in your preferred sequence.
Using An Appointment Flag In An Appointment
Here’s how to add an appointment flag in any appointment you create in Zanda:
-
Go to your calendar and create a new appointment.
-
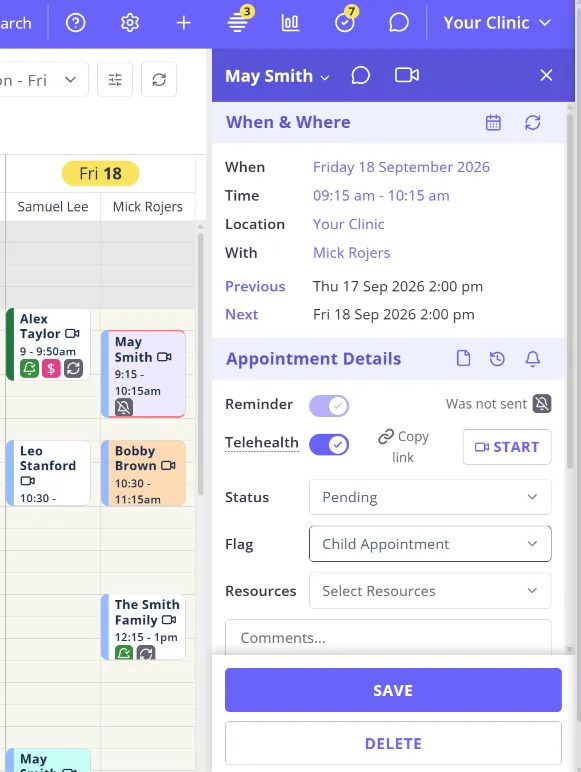
In the Appointment Settings Panel, enter all the details about the appointment and then scroll down until you see the Appointment Details section.
-
Click on Select a Flag and choose your desired appointment flag from the drop-down menu.
-
Click Save to save your new appointment.
The flag colour then fills the background of that appointment block on your calendar.
Important Notes:
-
If you make changes to an existing appointment flag settings in User Menu > Account Settings > Schedule > Appointment Flags, such as its name or color, these changes will apply to all appointments where this flag was added, including past dated appointment.
-
Each appointment can have one appointment flag at a time. If you choose another option from Select a Flag, Zanda updates the appointment to use that flag instead. For appointments that need more information, add extra context in the appointment notes.
Flag colours and appointment status colours on the calendar
Two different colours can appear on the same appointment on your calendar, and they come from different settings:
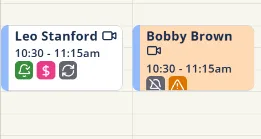
- The appointment flag colour fills the background of the appointment block. Only appointments that have a flag applied are filled with colour.
- The appointment status colour appears in the narrow strip down the left edge of the block. Every appointment has a status, so every appointment has a coloured left strip. A green strip, for example, means the appointment is Confirmed. See Appointment Statuses, Symbols and Calendar Legend for the full list of status colours.
So if an appointment looks all white apart from a coloured strip on the left, it does not have an appointment flag applied. To add one, open the appointment, scroll down to the Appointment Details section, and choose a flag from Select a Flag.
If an appointment warning is turned on, Zanda fills the appointment block with the peach warning colour instead of the flag colour. See How to Toggle Alerts for Clients.
Counting Appointments by Flag
To see how many appointments have been assigned each appointment flag, you can use the Appointments report with grouping.
- Click Reports and search for the Appointments report.
- Set your preferred filters (such as date range, practitioner, or appointment status), then click Run Report.
- Once the report loads, drag the Appointment Flag column heading into the grouping area at the top of the report table labelled: “Drag a column here to group by that column”
- The report will automatically group appointments by flag and display the total count for each flag type.
This works with all active appointment flags, including custom flags and the Client Portal Booking flag.
💡 Tip: To learn more about grouping report data, see Grouping Reports
Setting a Default Appointment Flag in a Client Profile
To set a specific appointment flag as the default for one or more clients, navigate to the appropriate client profile and select Admin > Manage > Default Appointment Flag > Select the relevant Appointment Flag > Save.
The Default Appointment Flag dropdown is populated from the active appointment flags in User Menu > Account Settings > Schedule > Appointment Flags. If an inactive flag is already saved on the client profile, Zanda keeps that existing selection visible so you can review it and choose a different flag if needed.
The selected flag is applied by default to new appointments your team creates for that client. Appointments the client books through your Client Portal use the Client Portal Appointment Flag instead (see below). Users can still manually change the flag on a specific client appointment when needed. When you change a client’s default appointment flag and save the profile, Zanda asks whether you want to apply the change to all future appointments for that client. Choose Yes, Update Appointments to update future existing appointments, or No to leave existing appointments unchanged.
Setting a Client Portal Booking Flag
You can set a default colored flag that will be automatically applied to all appointments clients booked via your client portal. This will help you see in a glance which appointments were booked online and might need your attention.
- To set the flag, navigate to User Menu > Account Settings > Client Portal > Access and Settings.
- Scroll down to the ‘Client Portal Appointment Flag’ settings and click the dropdown box next to it.
- Select the flag. (If you do not have the suitable flag, you can create it in User Menu > Account Settings > Schedule > Appointment Flags. )
- Save the changes.
The Client Portal Appointment Flag is added to every appointment booked through your Client Portal, whether the client is new or already has a profile with you. Portal bookings use this flag instead of a client’s Default Appointment Flag. If no Client Portal Appointment Flag is selected, appointments booked on the portal are saved without a flag.
Deactivating An Appointment Flag
Deactivating an appointment flag is easy.
-
Navigate to User Menu > Account Settings > Schedule > Appointment Flags.
-
In the Appointment Flags List, search for the Appointment Flag you want to make inactive.
-
Click on the gear icon located on that Appointment Flag’s extreme right and then click Deactivate. This will remove the Appointment Flag from your list.
Frequently Asked Questions
Can I use appointment flags in Revenue overview (Activity)?
No. Revenue overview (Activity), previously named Activity Report, does not include an Appointment Flag column or appointment flag filter. To count appointments by flag, click Reports, search for the Appointments report, run it with the filters you need, then drag the Appointment Flag column into the grouping area.
Can I run a report that excludes (omits) flagged appointments?
Yes. Click Reports, search for the Appointments report, run it with the filters you need, then open the filter menu on the Appointment Flag column header and choose Empty. This shows only appointments with no flag applied, so every flagged appointment is left out of the results.
The Empty filter works alongside your other report filters (date range, practitioner, status, and so on); it only narrows the Appointment Flag column, not the rest of your criteria. See Grouping Reports if you’d rather count appointments by flag instead of excluding them.
Does selecting an Appointment Flag add anything to the appointment’s Notes?
No. Choosing a flag from Select a Flag only sets that appointment’s colour on the calendar; it has no effect on the Notes field. To add information about the appointment, type it directly into Appointment Details > Notes.
If you want a note to appear automatically on a client’s future appointments, that’s a different, client-level setting: Alert Notes. Turn it on for a client under Admin > Manage on their profile, and Zanda copies the note onto every new appointment for that client. See How to Toggle Alerts for Clients for the steps.
Can I flag only appointments booked by new clients on the Client Portal?
Not automatically. The Client Portal Appointment Flag is added to every portal booking, and Zanda doesn’t choose a different flag based on whether the client is new or existing. A client’s Default Appointment Flag isn’t used for portal bookings either, so giving your existing clients a default flag won’t separate them.
If your goal is to make sure new clients receive and complete their intake forms, set this up on the new client instead of the appointment:
- Send the intake form automatically. Go to User Menu > Account Settings > Communication > Automations, add a New Client automation, choose Immediately after client created and Only clients created on portal, then add an Email action using a template that includes your intake form. If your team also adds new clients manually, choose All new clients instead. See Setting Up New Client Automations.
- Remind your team. Add a Task action to the same automation so someone is prompted to check each new client’s file.
- Follow up on unfinished forms. Use an Incomplete Forms automation to remind clients who haven’t completed their form yet.
- Get notified when someone registers. Turn on the New Client Registration notification for your team in User Menu > Account Settings > Schedule > Client Portal > Notifications. See Setting Up and Sending Client Portal Notifications.
If you’d still like a visual cue on the calendar, set a Client Portal Appointment Flag (for example, “Online booking - to check”). When your team confirms that a booking belongs to an existing client, open the appointment and choose a different option in Select a Flag. To review recently added clients, run the New Clients report (see Client Reports).