
Managing a Business Default Location
When you first create your Zanda account, the Setup Wizard automatically configures the first business address you enter as your default location. You can review and manage this at any time in your account settings.
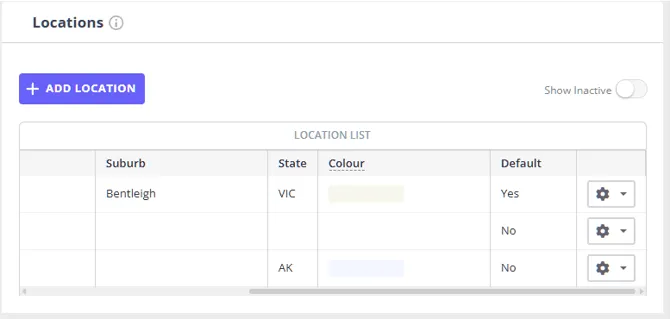
- Go to User Menu > Account Settings > Practice > Locations.
- Locate your active locations.
- Review which location has the Default status - this is marked as Yes or No in the Default column of the locations list.
Changing your Default Location
If you need to change your default location, you simply assign the default status to a different active location.
- Go to User Menu > Account Settings > Practice > Locations.
- Locate the existing location you want to make default and click to edit.
- Activate the “Default” switch.
- Save your changes.
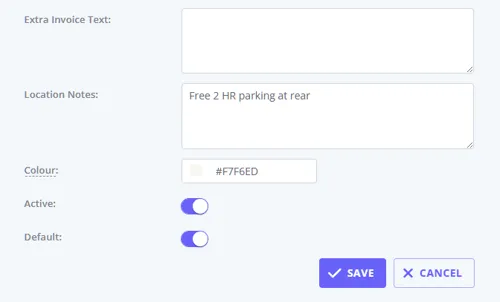
💡 Important: The system prevents you from deleting or deactivating your current Default Location. To remove it, you must first assign the Default status to another active location.
Understanding Default Location Fallbacks
The default location seamlessly supports your day-to-day operations by acting as a crucial fallback mechanism across Zanda.
Calendars & Appointments
- New Appointments in Unavailable Time: If a practitioner’s calendar does not have a default location for new appointments in unavailable times configured, the system automatically uses the business default location for such appointments.
- “All Locations” View: When viewing the calendar across “All Locations,” the default location determines foundational display settings, like your default availability block colour.
Invoicing & Billing
- Generating Invoices: Generating an invoice requires a valid location to associate charges and payments to your clinic.
Adding Additional Locations
-
Go to User Menu > Account Settings > Practice > Locations.
-
Click + Add Location.
-
Fill in the details of your new location.
- For our US users, you can select your Insured Place of Service from the dropdown on this page to be used for your locations.
- The Insured Place of Service field will be used to populate your claim if you are using claiming.
- Make sure one of your locations is Default.
Click ‘Save’.
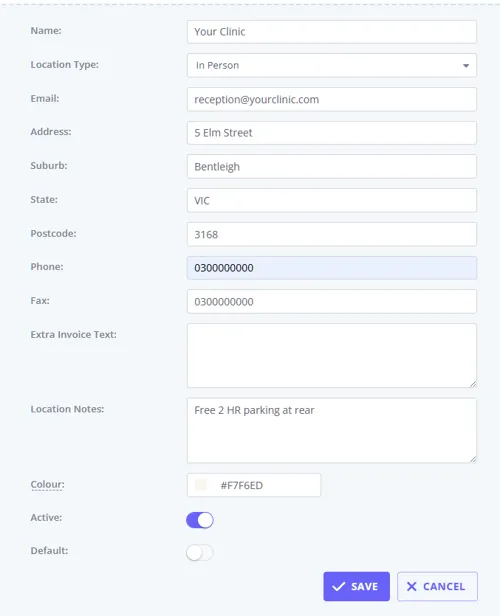
Important: All locations must be within the same country as defined in your Business Information settings. If you operate in multiple countries, you will need to set up and manage a separate Zanda account for each country.
Location address fields
The location form doesn’t have its own Country field. Your account’s country (set once in User Menu > Account Settings > Practice > Business Info) decides which address field labels appear on every location:
- Most accounts see Address, Suburb, State, Postcode.
- UK accounts see Address, Locality, Town, Postcode.
- US and Canadian accounts see Address, City, State, Zip Code.
Whichever labels you see, that field is free text: type the suburb, locality, or city in yourself. It doesn’t auto-populate from the Postcode or Zip Code field.
Changing the Location of an Individual Appointment
-
Click on the appointment in your calendar.
-
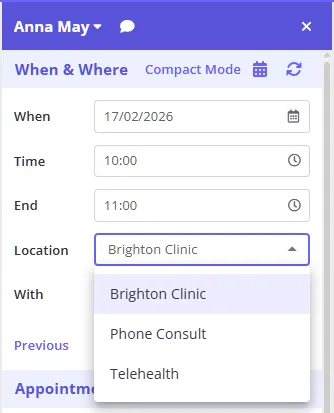
In the appointment panel, click on the ‘When & Where’ section to start editing the appointment.
-
Click on the drop-down menu next to Where. From the list, choose your desired location.
-
Scroll down to the bottom of the appointment panel. Click Save.
For one-off practitioner location changes, update the appointment location when only an existing appointment is affected. If the change should affect client bookable availability, see Setting Up and Editing Availability.
Setting Practitioner Availability For Each Location
You are able to link a location to an availability so that any new appointment booked into the available time will be linked to that location. You can link a location to an availability as follows:
-
Go to User Menu > Account Settings > Team > Availability
-
Select the practitioner whose the availability you wish to edit.
-
Click + Add New Availability and create a new availability for your new location.
-
Click on the Location drop-down to select the default location for the times in this availability.
-
Click ’ Save’.
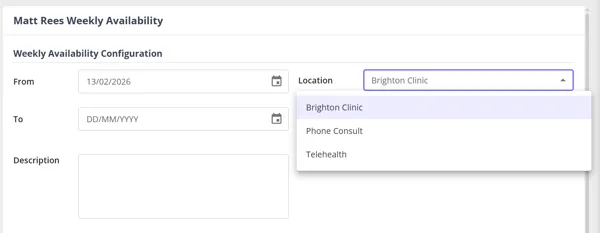
The list of availabilities will have a note of their locations for your reference.
Changing the Default Location for Unavailable Times for an Individual Practitioner
By default, any appointment added into an unavailable time will be linked to the default location selected for the practitioner. Only use the following if you would like to change the default location for unavailable time for a particular practitioner to something different.
-
Go to User Menu > Account Settings > Team > Practitioners.
-
Click on the practitioner’s name.
-
Navigate to ’ Settings’ on the left-hand side menu.
-
Change the ‘Default Location for Unavailable Times’ to your desired location.
-
Click Save.
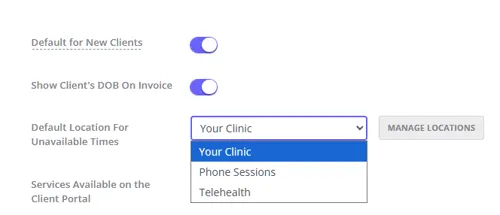
All new appointments entered in this calendar in times that are not available will now be assigned to the Default Location selected.
Hint 💡 Unavailable times will be shown as the default grey colour in the calendar. These are times that have not been made available for the practitioner.
Color-coding the Calendar by Location
You can give each location its own color, and the Calendar uses that color to shade the available times for that location.
To set a location’s color:
- Go to User Menu > Account Settings > Practice > Locations.
- Open the location you want to color and choose a color in the color picker.
- Save. The selected color is then displayed on the Calendar for that location’s available times.
When you view the Calendar across All Locations, your default location sets the default availability block color.
Entering a specific color 💡 You are not limited to picking a shade from the visual picker — you can type a color value straight into the Color box. Click the box and enter the value you want, such as a hex code like #3366FF.
Two related tips for multi-location calendars:
- Use the Calendar location selector to view appointments and available times for one location at a time.
- Link each practitioner’s Availability to the correct location so new appointments booked into those available times use that location by default.
Tip: The color of an individual appointment block comes from Appointment Flags, not from its location. If you also want booked appointments color-coded, create Appointment Flags that match your locations and apply the relevant flag to each appointment. See Using Coloured Appointment Flags for how flags and their colours work.
Frequently Asked Questions
Why does the Location list on my invoice show options that don’t look like locations?
The Location field on an invoice, and everywhere else you pick a location in Zanda, lists your account’s active locations using each one’s Location Name field exactly as it was typed, and nothing else feeds that list. If the options look wrong, for example if they read like appointment lengths or session types rather than addresses, a location was simply named that way when it was set up. Zanda doesn’t pull appointment types or any other data into this field.
To fix it, rename the location itself:
- Go to User Menu > Account Settings > Practice > Locations.
- Open the location you want to rename.
- Update the Location Name field to something that identifies the practice location, for example “Main Clinic” or “Consulting Room 2”.
- Click Save.
The new name appears everywhere that location is selectable, including on invoices.