
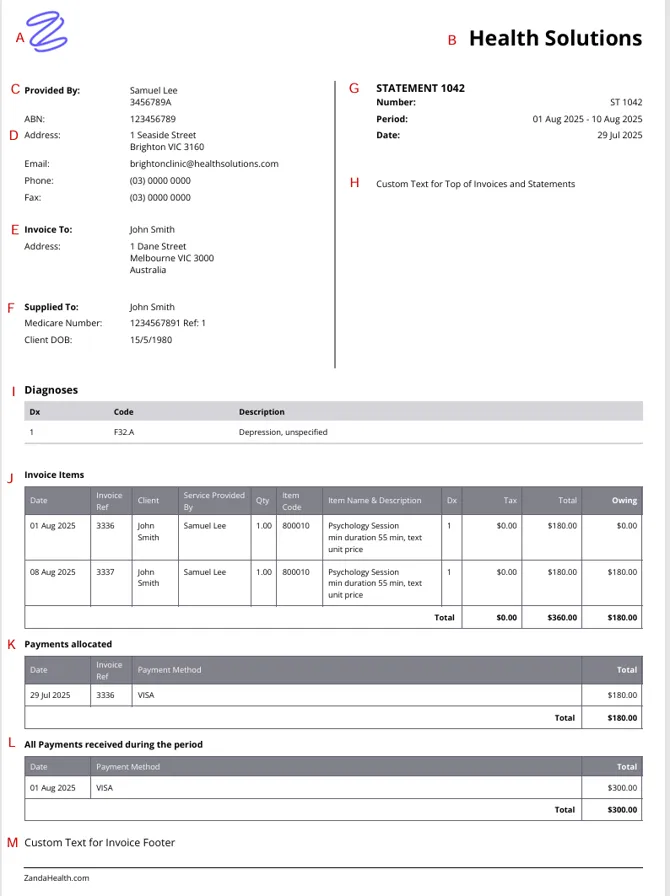
- A - Business Logo - upload it in User Menu > Account Settings > Billing > Invoices
- B - Business Name - This field can be found by going to User Menu > Account Settings > Practice > Business Info.
- C - Provided By - Appointment practitioner details, can be updated in User Menu > Account Settings > Team > Practitioners > Practitioner profile, ABN/Tax ID, set up in User Menu > Account Settings > Practice > Business Info
- D- Business Address and Contact Details: This field can be found by going to User Menu > Account Settings > Practice > Locations.
- E - Invoice To: Payee Name and home address: Brought from payee profiles (payees could be clients, contacts, and third parties)
- F - Supplied To - appointment/invoice Patient/Client Insurance Details & Date of Birth: This is entered into the client profile. You can opt to turn this information off on Invoices by going to User Menu > Account Settings > Team > Practitioners > Select a specific Practitioner > Settings.
- G - Statement’s name, number, period, and date created - this is all set in the payee profile > Billing > Statements when a statement is generated.
- H - Custom Text for Top of Invoices and Statements: This text field can be found by going to User Menu > Account Settings > Billing > Invoices.
- I - Diagnoses - this is a list of diagnoses that are allocated to client invoices. Diagnoses are managed in a client profile > Records > Diagnoses.
- J - Invoice Items - lists every invoice included in the statement individually, sorted by date, each with its own Client column - so a statement covering several clients (for example, a single third-party statement covering multiple clients billed to the same payer) lists every invoice separately in date order with one combined total, not a subtotal per client. On the invoice-selection screen, the Drag a column here to group by that column option only changes how invoices are grouped for you to review and tick before creating the statement - it does not change the order invoices print in. See the overview or each invoice item here.
- K - Payments Allocated - lists all payments allocated during the statement period. Each payment line includes date allocated, invoice #, payment method used, and amount allocated.
- L - All Payments Received During The Period - lists payments recorded during the statement period. Shows date received, payment method used, and total amount received.
- M - Custom Text for Invoice Footer: This text field can be found by going to User Menu > Account Settings > Billing > Invoices.
Frequently Asked Questions
Can I hide or remove the All Payments Received During The Period section?
Not entirely, there’s no layout setting that removes it, and its heading always appears on the statement or superbill. You can control what shows in it two ways:
- Leave out specific payments. Before generating the document, untick any rows you don’t want to include in the All Payments Received During The Period grid.
- Narrow it by payer. Set Payable By to a specific Contact or Third Party and the section is left blank automatically, since it only ever shows payments recorded on the client’s own profile. See Creating Superbills for the full Payable By walkthrough.
Why am I seeing statements as Invoice To: Client, when all client invoices are billed to their contact or third party by default?
- Statements created from the Client Profile > Billing > Statements will default to showing the client as the invoiced entity, even if the invoices are billed to their contact or third party.
- Proposed solution: create statements directly in payee profiles to see payees’ details listed in the Invoice To: section of the statement. For example, if client invoices are billed to their contact, go to Contact profile > Billing > Statements and generate the statement there.
Why doesn’t my statement show a payment due date?
- The Invoice Due Date setting applies to each individual invoice, not to a statement as a whole. Because a statement can combine several invoices, which may each have a different due date, Zanda doesn’t print one due date on the statement itself.
- If you’d like the payer to see when payment is due, add a note to the Custom Text For Statement field when you create the statement. This text prints near the top of the statement, below the statement number and date, and can include payment-due information, alongside any other instructions you want to add.