
People > Search gives you two ways to find people: Instant search for quickly looking someone up, and Advanced search for building filtered client, referrer, contact, and third-party reports that you can print or export.
Note: Looking for the Clients option that used to be its own item on the People menu? Once your account has the updated People > Search experience described in this article, it’s here now - Clients is already selected as the default profile type, so you’ll land straight on your client list.
Note: The whole People > Search page, both Instant search and Advanced search, requires the Advanced Client Search and Export permission (in User Management). Without it, Search doesn’t appear on the People menu, and opening the page directly doesn’t work either. If you’re missing this permission, use the Quick Search bar in the top toolbar to find and open an individual client’s profile instead.
Using Instant Search
Go to People > Search - it opens directly into Instant search, the fastest way to find someone. Type into the search box and results update automatically as you type; there’s no button to click and no page to load.
Instant Search matches on first, middle, and last name; preferred name; company name; client/profile number; home, work, and mobile phone numbers; and email address. If your search text looks like a date, it also matches an exact date of birth.
Use the profile type chips above the search box (Clients, Shared Profiles, Contacts, Referrers, Third Parties) to choose which types to include - select more than one to search across types at once, or leave none selected to search every type you have access to.
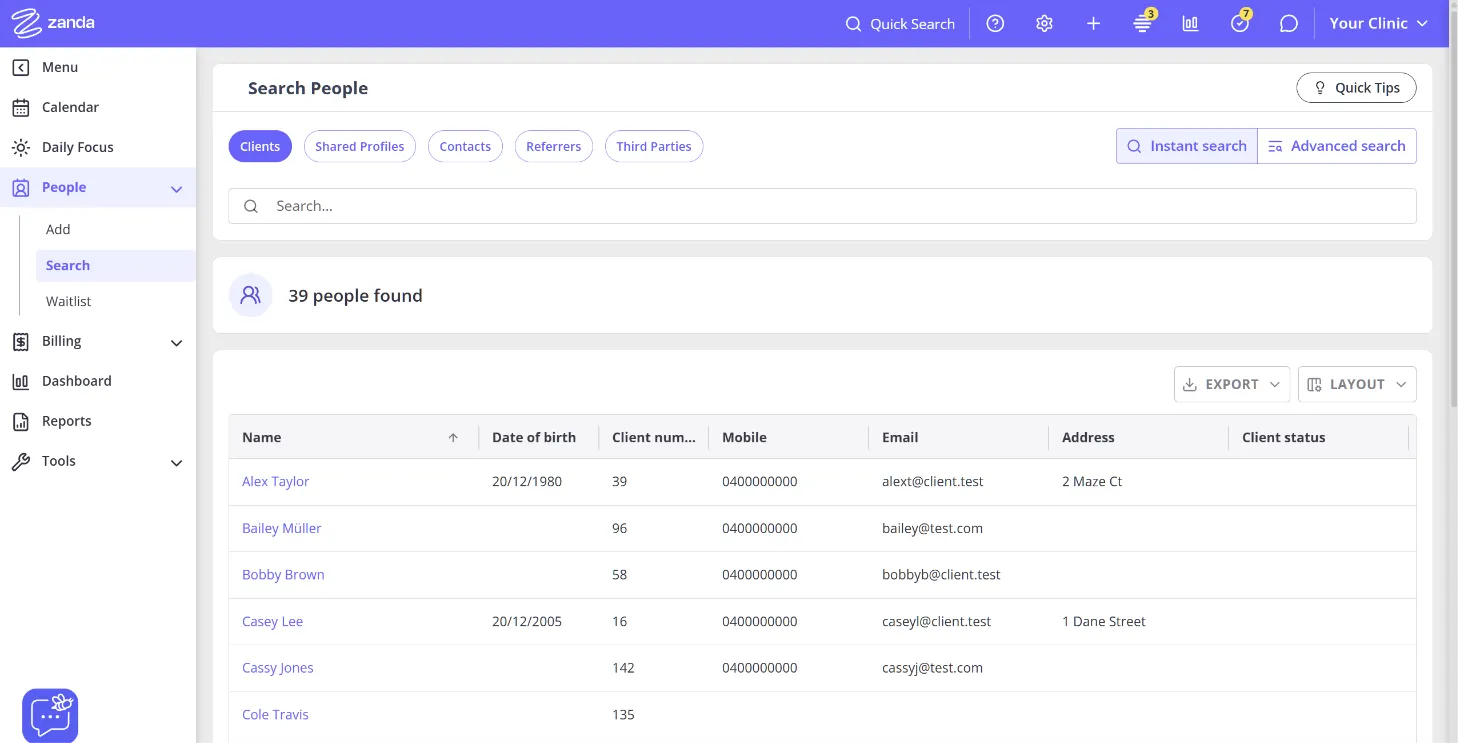
Every search, Instant or Advanced, shows a results summary above the list: 1 person found, or N people found.
Using Advanced Search for reports
You can use Advanced Search to answer practical reporting questions, such as:
- Which clients have had appointments during a specific date range
- Which clients have not booked a future appointment
- Which clients are linked to a specific practitioner
- Which clients belong to a particular classification
- Which clients match demographic fields such as sex, gender identity, date of birth range, client status, client type, or referrer
- Which referrers, contacts, or third parties match selected criteria
This makes Advanced Search useful for client activity reports, practitioner-specific reports, re-engagement lists, marketing lists, and other detailed reporting needs. After generating a filtered list, you can print it or export it to CSV, Excel, or PDF.
Note: Users need the Advanced Client Search and Export permission to generate and export filtered lists this way.
From People > Search, select Advanced search to expand the filters. The same profile type chips described above apply here too.
Understanding the filters
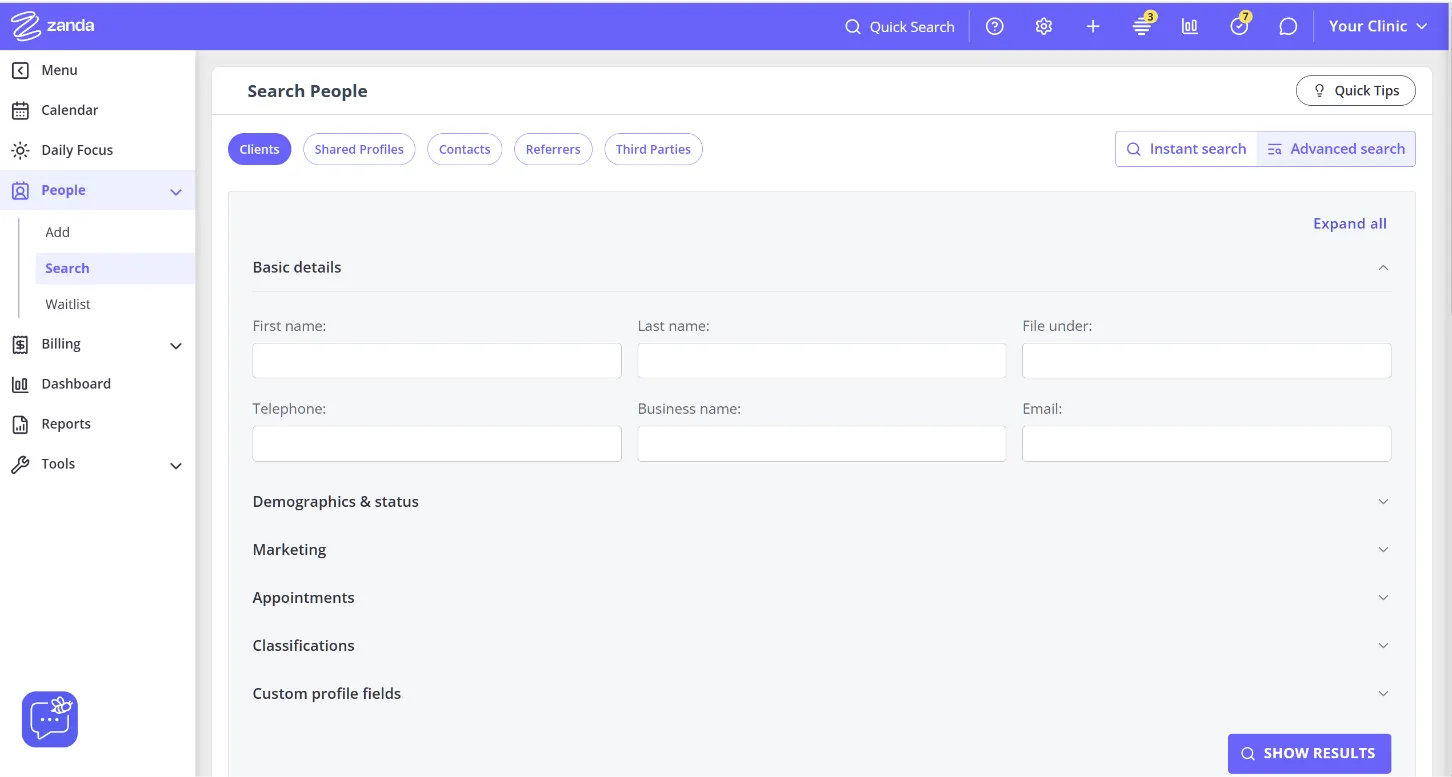
The filters are grouped into six collapsible sections: Basic details, Demographics & status, Marketing, Appointments, Classifications, and Custom profile fields. Basic details is open by default; click a section’s header to expand or collapse it, or use Expand all (top right) to open every section at once.
While most of the fields are self-explanatory (first name, last name, telephone, email, sex, gender identity, date of birth range, date added to a Zanda account, and so on), a few are worth calling out:
- Demographics & status also holds practitioner and referral fields: Primary practitioner, Assigned practitioners, Insurance number, and Referrers, alongside client status, client type, and archived state.
- Marketing covers Marketing communication, Marketing source, and Receives SMS.
- Appointments covers appointment activity and date-range filters, described below.
Tip: The previous version of Advanced Search filtering options are available on:
-
The Bulk Send page: Allow you to quickly send bulk emails or SMS messages to your generated client list with just one click.
-
Mailchimp integration page: Through the Mailchimp integration, you can seamlessly export your selected clients to your Mailchimp account for email marketing campaigns.
Filtering by Practitioner Type
You can use Advanced Search to generate a filtered list of clients based on their relationship to practitioners. This allows you to quickly identify clients who are linked to specific practitioners in different ways and export the results if needed.
- Primary Practitioner: Get a report of clients who have the selected practitioner set as their Primary Practitioner in the client profile > Admin > Manage page.
- Assigned Practitioners: Get a report of clients who have the selected practitioner added as an Assigned Practitioner in the client profile > Admin > Manage page.
- Appointment Practitioner: Get a report of clients who have had appointments with the selected practitioner.
These filters can be useful for generating practitioner-specific reports, reviewing client allocation, identifying which clients a practitioner has seen, or finding clients connected to a practitioner through their profile settings or appointment history.
Appointment activity, Had an Appointment Between, and No Appointments Between
The Appointments section has an Appointment activity choice with three options: Any, Has future appointments, and Has no future appointments. Alongside it are the Had an appointment between and No appointments between date-range filters, which can be extremely powerful when running reports on client activity within your business.
- For example, to find clients who have had an appointment this year but don’t have one booked for the future, set Had an appointment between to 1 January of this year through today, and set Appointment activity to Has no future appointments.
- Setting Appointment activity to Has future appointments takes over from the Had an appointment between range for that search, so you don’t need to set both.
This makes Advanced Search particularly useful for running re-engagement reports or identifying clients who may need follow-up.
Using Multiple Filters to Refine Search Results
You are able to use all of these filters in conjunction with each other. This means that you can refine the results of the search down to look only at what you’re after.
For example, you might want to run the above search but only look at data relevant to a specific practitioner and clients with a particular classification applied. In this case, you would set the above filters up and then simply select the relevant classification (or classifications) and the practitioner that you’re wanting to report on.
Tip: Filtering logic:
-
Classification toggles use OR logic (not AND).
-
Selecting multiple classifications finds clients with any of them.
-
Also, if you select no toggles, the search defaults to all clients (not just those with no classifications).
Reading the results summary
Once you click Show results, a summary appears above the list, and it works a little differently depending on the mode:
- Instant search shows just the count: 1 person found, or N people found.
- Advanced search shows the same count, plus a filter summary: Filters applied (or No filters applied, if you ran the search with nothing set) and one removable chip per active filter, in the format Category: Value - for example Profile type: Clients or Primary practitioner: Mick Rojers.
Click the x on a chip to remove that filter, or Clear all to reset every filter at once. Either action updates the filter form to match, but it doesn’t re-run the search by itself - click Show results again afterwards to refresh the list.
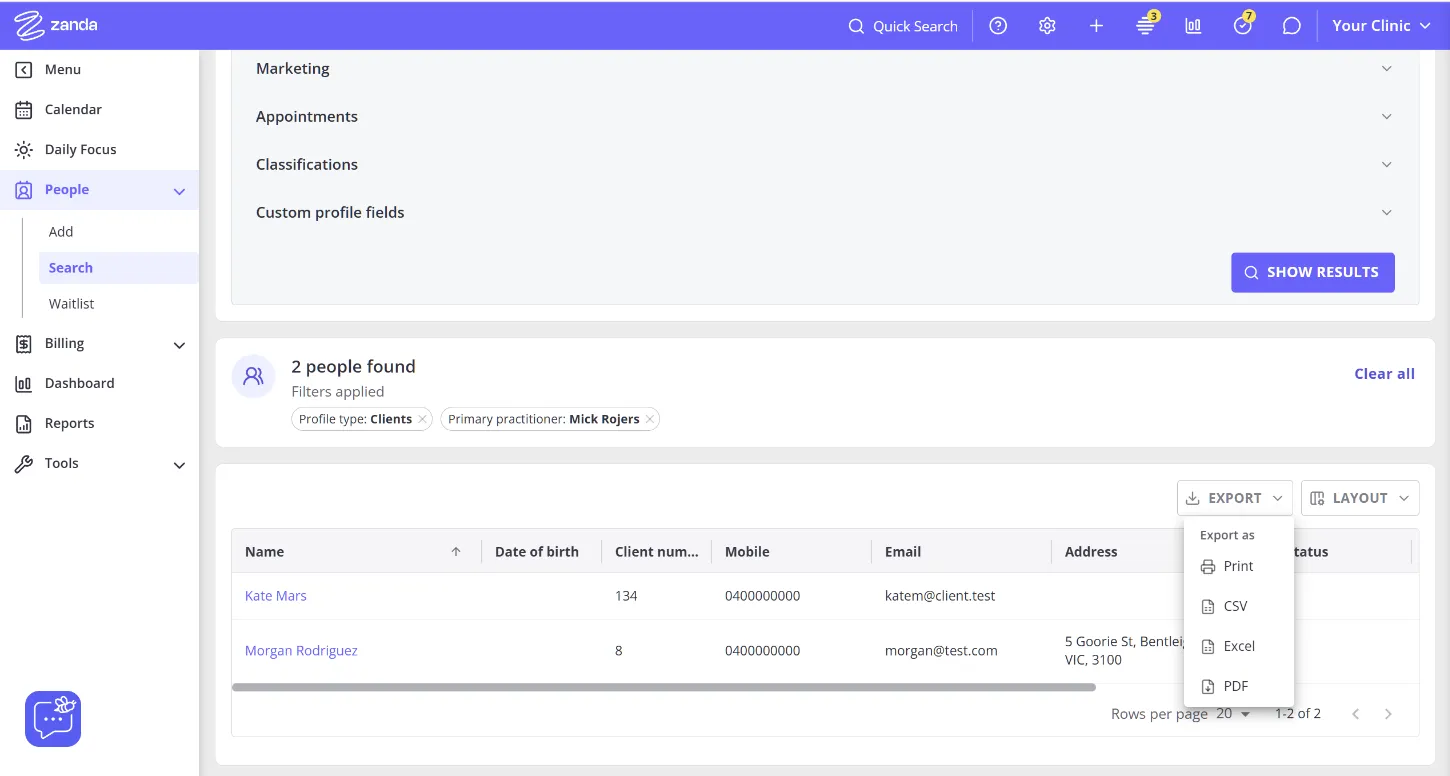
Note: The filtered list loads on this same page, directly below the filters, and does not open a new page or pop-up window. If you have several filter sections expanded, the results can render below what’s currently visible on your screen. If nothing seems to happen after you click, scroll down the page to see your filtered list.
Exporting and refining the results
Once the list has been generated, use the Export button above the grid to print it, or export it as CSV, Excel, or PDF.
Note: Use the Layout button above the grid to show, hide, and reorder columns in the results. A saved column layout doesn’t carry over between visits, so if you want to keep a specific layout permanently, export the results to Excel and adjust the columns there instead.
Frequently Asked Questions
What’s the difference between Instant Search and Advanced Search?
Instant Search is the default view when you open People > Search: type a name, phone number, email, client number, or date of birth and results update as you type - it’s built for quickly finding one person. Advanced Search is the toggle next to it: it expands additional filters (practitioner relationships, appointment history, classifications, and more) for building and exporting a filtered report, rather than looking up an individual.
How can I find people who registered through the Client Portal but have not booked an appointment?
For portal registrations, use Advanced Search as a follow-up workflow rather than an automatic portal-registration filter. Go to People > Search > Advanced search (with the Clients profile type selected), then use Date Added to focus on the registration period you want to review.
In the Appointments section, use the filters that match your follow-up goal:
- Set Appointment activity to Has no future appointments to find clients without an upcoming appointment.
- Use No Appointments Between to find clients who had no appointments during a specific date range.
- Use Appointment Practitioner or Appointment Location if you want the appointment filters to apply to a specific practitioner or location.
- Select any relevant Classifications, Client Status, or Marketing Source filters if your practice uses those fields to organize new inquiries.
- Click Show results, choose the contact columns you need, then export the list to Excel or PDF.
Marketing Source is different from portal registration. Marketing Source is a client profile field for client marketing sources, so use it only when your practice records portal inquiries with a matching source.
If you need to review appointments that were booked through the Client Portal, click Reports, search for Appointments, and include the Source column. Portal-booked appointments appear with Source set to Portal.
How can I find clients who are seeing a practitioner other than their primary (or assigned) practitioner?
Advanced Search doesn’t have a single report that compares a client’s Primary Practitioner against the practitioner on their appointments, but you can answer the same question by combining two of the practitioner filters. Because all Advanced Search filters work together (AND), you can cross-reference who a client belongs to against who they have actually been booked with.
To review one practitioner’s clients:
- Go to People > Search > Advanced search (with the Clients profile type selected).
- Set Primary Practitioner (or Assigned Practitioners) to the practitioner the clients belong to.
- Set Appointment Practitioner to the practitioner (or practitioners) whose appointments you want to check against.
- Click Show results. The results are the clients whose primary or assigned practitioner is the first person but who have had appointments with the second - in other words, clients being seen by someone other than their own practitioner.
- Choose the columns you need and export the list to Excel or PDF.
Run this one practitioner at a time—change the Primary Practitioner to each practitioner in turn—to review your whole practice, or leave Appointment Practitioner set to a specific covering or locum practitioner to see every client they have seen, regardless of who those clients belong to.
If you would rather prevent this at the booking stage, you can restrict Client Portal online bookings so clients can only book with their own practitioner. See Assigning Multiple Practitioners to a Client Profile and the Clients Can Book With Any Practitioner setting.
Can I search or filter my client list by which private health fund (insurer) each client is with?
No, Advanced Search and Bulk Send don’t have a filter for private health fund or insurer, so you can’t generate a client list or message a subgroup based on which health fund a client is with.
If you want to message a specific group of clients about something health-fund-related (for example, letting them know a fund’s provider numbers have changed), the closest way to do this in Zanda is with Client Classifications:
- Create a classification for the group you want to message (for example, one named after the health fund).
- Add that classification to each relevant client’s profile under Profile > Classifications.
- Go to People > Search > Advanced search (with the Clients profile type selected), or Bulk Send to email or SMS the group directly, select that classification in the filters, and generate or message the list.
See Setting Up and Using Client Classifications for how to create and assign classifications.
This does mean classifying clients manually. Zanda doesn’t currently treat a client’s recorded insurer as a searchable or filterable field, only as billing and invoicing information on their profile.
Can I search, filter, or export a list of clients who don’t have an emergency contact recorded?
No, Advanced Search and Zanda reports don’t have a filter for whether a client has an emergency contact on file, so there isn’t a way to generate or export that list directly.
Emergency contact is recorded per contact when you add a client contact rather than as a searchable client-level field, which is why it isn’t available as a report or Advanced Search filter. To check whether a client has an emergency contact recorded today, open the client’s profile and review their Contacts section individually.
Can I search or filter my client list using a Custom Profile Field, like a unique client reference number?
Yes, but it depends on the field type. In Advanced Search, you can filter by a Custom Profile Field when it’s set up as one of these types:
- Date
- Numeric
- Yes/No toggle
- Select single or Select multiple
Single line text and Multiple line text fields aren’t available as Advanced Search filters. The field still appears on the client profile, in templates, and in exports; it just can’t be used as a filter criterion.
So if you want to give each client a unique reference ID and be able to search or filter your client list by it, create the Custom Profile Field as Numeric rather than text. See Add and Manage Custom Profile Fields for how to set one up.
Tip: Every client already has a system-generated Client Profile Number, shown in brackets next to their name on the profile. It’s unique, but the numbering sequence is shared across clients, referrers, contacts, and other profile types, so it isn’t exclusively sequential for clients alone.
Can I save my filters, or keep a client list open to come back to?
You can keep one list open and work through it, for example when you’re tidying up your archived clients, using the options below - your filtered list and results stay exactly as they were while you do.
There’s no option to save a search as a view, and Advanced Search doesn’t remember your filters or results between visits. If you leave or refresh the page, set your filters again and click Show results to get the list back. Click Show results with no filters selected any time you want the full client list.
- Open each client in a new browser tab. Client names in the results are links. Right-click a name and choose to open it in a new tab (or hold Ctrl, or Cmd on a Mac, as you click). Make your changes on the client’s profile in that tab, then close it. Your list is still open in the original tab with your filters applied.
- Archive or unarchive straight from the list. Use the Archive switch on a client’s row to archive or unarchive them without opening their profile. The list refreshes after each change, so if Archived is set to Archived Clients Only, a client you unarchive drops off the list.
- Make the same change to many clients at once. To archive a group of clients, or change something like their Client status or primary practitioner, use Tools > Bulk Update. You set your filters once, tick the clients you want, and apply each change to all of them from that one list. See Updating Profiles in Bulk for the steps and the permissions it needs.
To keep a copy of the list to work from over several days, export it with the Export button above the results.
Re-run your search whenever you need up-to-date results: like every list in Zanda, including the Client Statistics report, Advanced Search results are a snapshot at the moment you generate them, not a live or standing view.