
Overview:
There are five main parts of the dashboard. The main menu sidebar, the top panel, the calendar toolbar, the user menu and the calendar itself. In this article, we will explore each part of the dashboard, except the calendar, which we’ll discuss in a separate article.
The Sidebar Menu
Inside the sidebar menu, you will find seven items.
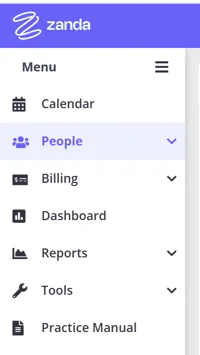
- Calendar: This will take you straight to the main dashboard - no matter what page you’re currently on.
- People: This includes options to create new clients, referrer and third-party profiles, search existing profiles and access your waitlist.
- Billing: Here, you’ll find the options to create and view invoices and payments.
- Dashboard: this feature contains practice relevant metrics including invoicing, appointments, and clients statistics.
- Reports: This is where you can get the options to generate multiple types of reports regarding your health practice.
- Tools: This gives you access to handy tools, like the form designer, Medicare billing, communication templates and more.
- Practice Manual: You can access your clinic’s practice manual by clicking option. In addition to enabling it for all users, you can add new sections and articles to your practice manual, or modify the existing content to bring it inline with your clinic’s procedures/practices.
💡 Pro Tip You can click on the Zanda logo on the top-right corner to quickly jump back to the main calendar page.
- To access the options within each menu item, simply click it.
- To minimize the sidebar altogether, click the three horizontal bars on the top-right corner of the sidebar.
The Calendar Toolbar
This toolbar (described below left to right) quickly lets you navigate to different positions on your calendar. The location of the filters and buttons is dynamic to cater for the size of your screen.

-
Practitioners Filter: This lets you select which practitioner’s calendar you want to view. If you have more than one practitioner, you can view all practitioner’s calendars at once, or else if you have set up groups you can view a group of practitioners in the calendar.
Only one practitioner showing, and the filter won’t open? That’s usually not a browser problem. The Practitioners Filter only offers the calendars you have access to. When there’s only one, it’s typically shown on its own with no list to pick from (unless your practice has turned on Show Calendar Names As Dropdown List under calendar display settings, which keeps the dropdown even for one calendar). The single-calendar display itself happens when:
- your user profile doesn’t have the View all Calendars permission, so you only see the calendar of the practitioner set as your Default Practitioner Profile, or
- your practice has only one active practitioner.
If you need to see other practitioners’ calendars, or the calendar you’re stuck on isn’t your own, ask whoever manages users in your practice (for example, the Master User) to open your user profile under User Menu > Account Settings > Team > Users > User Management. They can then turn on View all Calendars or set the correct Default Practitioner Profile. See Managing Users for what each permission does.
-
Locations Filter lets you view all locations, or a specific location. Only practitioners made available for the location will have available times in the calendar for the location.
-
Use the left and right arrows to move the calendar back or forward by however much you are viewing at a time, a day in Day view, a week in Week or M-F view, and a month in Month view. Keep clicking to move as far into the past or future as you need. Click the date shown beside the arrows (for example, “Sept ‘26”) to open the date panel. From there, pick any day in the mini calendar to go straight to it, or use Jump Forward to skip ahead by 1, 2, 3, 4, 6, 8 or 10 weeks, or by 1, 2, 3, 6 or 12 months. This date navigation group sits on its own on the toolbar.
-
Click Today to bring the calendar view back to the current date. If your calendar still shows the previous toolbar, Today has a small downward arrow next to it, and the same jump-ahead options (1 week through to 12 months) sit in that dropdown rather than in the date panel.
-
By clicking Day, M-F, Week, or Month you can switch your calendar to show only a day, from Monday to Friday, or the completely week from Monday to Sunday.
- The client’s phone number and address appear directly on the appointment block when both of these are true: the calendar is set to Day view, and the Practitioners Filter is set to a single practitioner. If you are viewing all practitioners or a practitioner group, appointment blocks stay compact and these details are hidden. The address comes from the client’s profile, so it only shows for clients who have an address saved. Client addresses are also included when you print your schedule, whichever view you are in.
- Going out to clients? Select the address on the appointment block and it opens that location in Google Maps, ready for directions. On an iPhone or iPad it opens in Apple Maps instead. Set the calendar to Day view and choose the single practitioner in the Practitioners Filter first, otherwise no address is shown. Private Mode replaces the address with “PRIVATE MODE”, so switch it off when you need to navigate. If you would rather take the day’s addresses with you on paper, print your appointment list, which includes the client address for every appointment.
- If you set your calendar to one practitioner only, you can switch it to Month view.
-
Click the Calendar Filters button to filter your appointments by the note status, invoices created and paid/unpaid, and appointment flags.
-
If you have another user create appointments for you, you can click the refresh button (two circular arrows) to update your calendar.
-
By clicking the ‘Private Mode’ button (a crossed out eye), you can stop client names from appearing on your calendar.
Today, Day/M-F/Week/Month, Calendar Filters, Refresh, and Private Mode are grouped together on the toolbar, right after the date navigation.
- The Finder button quickly opens the Time Finder panel to search for the appointment time and allocate a resource to an appointment.
- Click the Waitlist icon to open your practice’s waitlist.
- Clicking More Options (the three vertical dots), the last control on the toolbar, gives you the option to
- hide (or show) unattended/cancelled appointments,
- print your appointment list,
- or view your calendar legend.
Finder, Waitlist, and More Options are grouped together at the end of the toolbar.
The current day’s column header shows a highlighted pill around the date, so it’s easier to spot at a glance in a full week or multi-practitioner view. Appointment blocks on the calendar have rounded corners, and an appointment you don’t have permission to view the details of shows a lock icon instead of any client information.
The Top Panel
The top panel includes several important elements (described in the order left to right):

- Zanda logo: takes you to the main calendar screen when you click on it.
- Quick Search: Using this, you can search clients, appointments, invoices, third parties and referrers in your account.
- Help: Click the question mark icon to open the Help Menu for instant access to support resources, documentation, and feedback mechanisms.
- Settings: Click the gear icon to open the Settings Springboard and navigate to your Zanda account settings pages.
- 💡Note: only a Master User and users who were granted the permission to ‘Setup and Configure Zanda’ will see the Settings icon.
- Quick Actions: the plus icon allows you to perform common actions—like creating appointments, adding clients, or starting session notes—without navigating away from your current work.
- Practice Hive: this is a central hub in Zanda where you can get notifications about what is happening in your practice, see product release notes and chat with your team.
- Practice Dashboard: contains practice relevant metrics including invoicing, appointments, and clients statistics.
- Tasks: This area lets you see your task alerts, such as client birthdays, expired session packs or custom tasks you created.
- SMS Messenger: Here, you can view your existing SMS conversations with clients, or start a new one.
- User Menu: Sitting behind your account business name, this is the main user panel for accessing personal settings, navigating between accounts, and managing account-level configurations
Important: A dedicated Toll-Free Number (TFN) is required to send/receive SMS messages in the USA, Canada, Puerto Rico, Bahamas, Jamaica, Costa Rica, and Barbados. For more details, please click here.
The User Menu
The User Menu is your central access point for personal settings, switching between accounts, and managing key account-level configurations. It’s available from any page in Zanda by clicking your account name in the top-right corner.
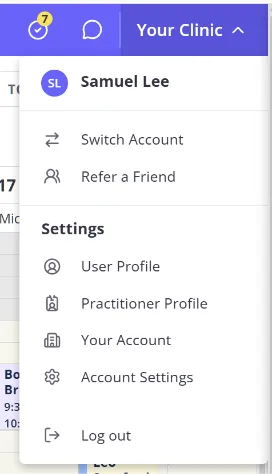
What you’ll find in the User Menu:
-
Switch Account
Quickly move between linked Zanda accounts you have access to, without logging out. -
Refer a Friend
Access your referral link to invite others to Zanda via email, social channels, or messaging apps (available for eligible accounts). -
Settings
A collection of shortcuts to important configuration areas:-
User Profile – Manage your personal details, login credentials, and security settings (including password and 2FA).
-
Practitioner Profile – Update practitioner-specific settings such as availability, calendar sync, provider numbers, online payments, and more (where linked and permitted).
-
Your Account – View and manage subscriptions, billing details, payment methods, invoices, and optional add-ons.
-
Account Settings – Access practice-wide settings including business information, locations, users, calendars, communication templates, billing, and other core configurations (permission-based).
-
-
Log out
Securely sign out of your Zanda account.
Menu options may vary depending on your role, permissions, and account setup.