
You must fill out your HW027 form to register for Online Claiming. If you or any providers that submit claims through your account have not filled out this form previously please do so immediately. Details on how to fill out the form and submit it to Medicare can be found here. Please keep Question 3 on the form blank.
In order to begin making DVA claims through Zanda you will need to configure the insurer and provider numbers — this article will go over how you can do this within your account.
Adding the DVA Insurer
Adding a DVA insurer to your account will allow you to record your provider number as well as your client’s Veteran File Numbers and other important information used when submitting these claims. To add a DVA insurer to your account follow the steps below:
- Go to User Menu > Account Settings > Payments > Insurers.
- Click + Add Insurers.
- Enter the insurer name (‘DVA’) and select DVA as the Type.
- Tick the Show on Invoice option if you would like your insurer information to appear on your invoices and receipts.
- Use the Text on Invoice field to record any text that you would like to appear on the invoice with your provider number (ie ‘DVA Provider Number:’).
- Click ✔ Save.
Adding Your DVA Provider Number to Your Practitioners
You will need to add your DVA provider number to your Calendar in order to be able to submit DVA claims through Zanda. Here’s how:
- Go to User Menu > Account Settings > Team > Practitioners and select your practitioner.
- Click on Insurers and click + Add Insurers.
- Select the DVA insurer you have just set up.
- Select the Service Type.
- For DVA Allied Claims: Choose either Community Nursing, Speech Pathology, Allied, or Psychology (includes counsellors).
- For DVA Paperless claims: Choose either General Practitioner or Specialist (includes allied health).
- Enter your provider number.
- If a different provider will be paid for the claim, then enter their name and number in the Payee Provider Name and Payee Provider Number field. Otherwise, leave those blank.
- Select the relevant location or select ‘All’ to use across all locations.
- Switch on “Default For All Clients” to have this insurance automatically applied as clients default insurer.
- Click ✔ Save.
Hint 💡
If most of your clients claim through DVA, switch on Default For All Clients so the insurer is assigned automatically. Note that this also applies the insurer to that practitioner’s existing clients, not only new ones.
Recording DVA Patient Information
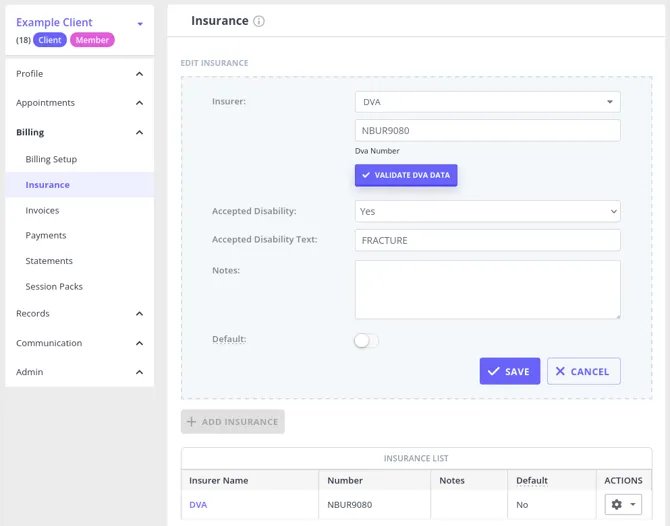
To commence claiming you will need to ensure that you have recorded a client’s DVA card details, to add these to their client record follow the steps below:
- Navigate to the client’s record.
- Go to Billing > Insurance.
- Click + Add Insurance.
- Select DVA as the type.
- Enter the client’s DVA number and click Validate DVA Data.
- If the client holds a DVA White Card, set the Accepted Disability dropdown to Yes and enter the patient’s diagnosis(their accepted disability description, e.g. FRACTURE, PTSD, ANXIETY DISORDER) in the Accepted Disability Text field. This is the condition DVA uses to confirm the service relates to a covered disability.
- Select ‘Default’ if the client will be claiming through DVA for a majority of their appointments (this will automatically add the insurance to the client’s new invoices to facilitate claiming).
- Click ✔ Save.
Frequently Asked Questions
How do I set up a client for DVA claiming?
Start with the account setup, then add the client’s DVA details to their profile. Before you submit a DVA claim, the client needs DVA insurance recorded on their client profile and linked to the invoice.
Use this checklist:
- Add DVA as an insurer in Settings > Payments > Insurers.
- Add each practitioner’s DVA provider number under Account Settings > Team > Practitioners > Insurers.
- Open the client record and go to Billing > Insurance.
- Click + Add Insurance, select DVA, enter the client’s DVA number, and click Validate DVA Data.
- If the client holds a DVA White Card, set Accepted Disability to Yes and enter the accepted disability description in Accepted Disability Text.
- Select Default if most of the client’s appointments will be claimed through DVA, so DVA insurance is added to new invoices for that client.
Can I export a list of my DVA clients showing their Accepted Disability?
You can build this list from two Data Export files, using the Allow Data Export permission (plus access to all client profiles if you want every client in the account - see Exporting Your Data). There isn’t a single report or export that shows both together, because Accepted Disability is saved on each client’s DVA insurance record (Billing > Insurance) and the client list exports and reports don’t include it.
- Go to Tools > Data Export, choose All Data, and select Client Insurance, then click Export. The Client Insurance.csv file has one row per insurance record, with the client’s Client Number, name, date of birth, Insurance Name, Insurer Number (the DVA file number for DVA records), and Active status. Filter the Insurance Name column to your DVA insurer (for example, DVA) to get your list of DVA clients. This file doesn’t include the Accepted Disability fields.
- In the same export, also select Medicare Claims. Medicare Claims.csv is the only export that includes the Accepted Disability indicator (Y or N) and the Accepted Disability text. It has one row per claim, not per client, and the Type column shows DVA Paperless or DVA Allied Health for DVA claims. The Accepted Disability values are the ones on the client’s DVA record when each claim was created.
- Open both files in Excel or a similar program and match the rows by client name or DVA file number (the Insurer Number in Client Insurance.csv and the Veteran File # in Medicare Claims.csv).
A DVA client with no claim in Zanda yet won’t appear in Medicare Claims.csv. For those clients, and to confirm a client’s current Accepted Disability details, open the client’s record and check Billing > Insurance.
For more on the export files, see Exporting Your Data.