
How New Clients Register for the First Time
Clients can start the registration process from several places in your Client Portal:
-
Register button in the header (visible to anyone not logged in)
-
During appointment booking (if enabled) – if a client tries to book but isn’t logged in
-
During class booking (if enabled) – registration or login is required
- The system will prompt them to login or register if this is their first time on your client portal. A new client should click Register and complete the registration form.
When a client clicks Register, the portal opens a simple two-step process: entering their details and verifying their identity.
Step 1: Entering Registration Details
Clients first complete a short form that asks for:
-
First Name
-
Last Name
-
Email Address (used as the login username)
-
Password (6–30 characters, with a strength indicator to guide them)
-
Mobile Number
-
Required only if your clinic uses SMS verification
-
Optional if your clinic uses email verification
-
After entering their details, clients click Get verification code.
The portal then sends a 6-digit code to:
-
The client’s email, or
-
Their mobile number, depending on your clinic’s chosen verification method.
-
A client will be able to resend the verification code if they didn’t receive it.
A message on screen confirms where the code was sent, but only while the client is on this first screen, before they click Get verification code. That confirmation doesn’t carry over to the next screen, so it’s worth the client noting whether it says email or mobile number before moving on.
Pro Tip: If you want to collect more client information when they register, use the New Client Intake online form embedded in the Client Portal registration confirmation message which Zanda will send automatically after you’ve set it up once. Learn more here.
Step 2: Verifying Identity and Creating the Account
On the next screen, clients:
-
Enter the 6-digit verification code
-
Accept your booking Terms and Conditions (only if you’ve enabled them on the User Menu > Account Settings > Client Portal > Access and Settings page)
-
Click Register
If everything is correct, the client:
-
Has their account created
-
Is automatically logged in
-
Is redirected to complete their booking or view their client portal dashboard
If the code has expired or is incorrect, the portal provides a clear message and lets the client request a new code.
What Happens Behind the Scenes
When the person is not yet in your system
If your clinic allows new client creation through the portal:
-
A new client record is created
-
Your team receives a notification
-
The client is logged in immediately
If a client profile with the same details already exists:
-
First name
-
Last name
-
Email address
-
Mobile Number (if provided)
The system will match the details and recognise it is the same person. Instead of creating a duplicate new client profile, it will link them to an existing client profile.
If your clinic does not allow new client creation:
-
The portal displays a message asking them to contact your clinic instead
-
No record is created
Settings That Control Registration
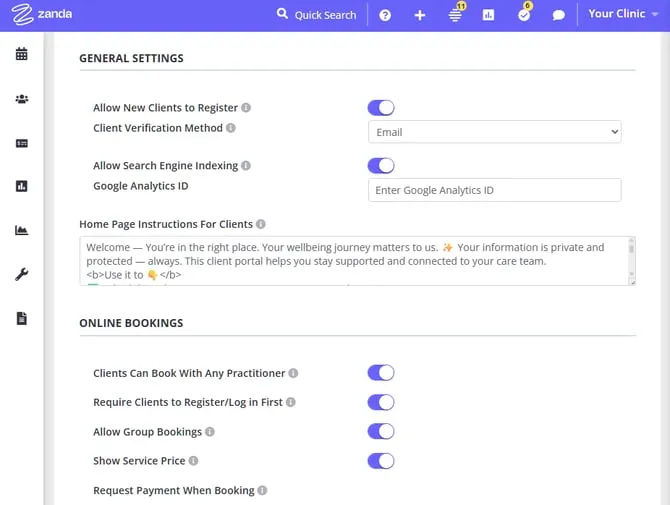
You can customize how registration behaves in User menu > Account Settings > Schedule > Client Portal > Access and Settings.
1. Allow New Clients to Register
-
Enabled → brand-new clients can sign up themselves
-
Disabled → only existing clients can log in and reset their password
2. Client Verification Method - Choose how the portal verifies new accounts:
-
Email verification
- Clients receive their code by email
- Mobile number becomes optional
-
SMS verification
-
Mobile number is required
-
Clients receive their code by text message
-
3. Require Clients to Register/Log in First - Controls whether clients must log in/register before booking appointments. If enabled, registration prompts appear earlier in the booking flow.
4. Booking Terms and Conditions
-
Optional
-
If enabled, clients must tick a checkbox to proceed
-
You can include your full policy text in an expandable section
Security and Privacy Protections
The registration process includes:
-
Strong password protection with real-time strength feedback
-
Unique, time-limited verification codes
-
Country-specific mobile number validation - checked against your clinic’s own account country, not the client’s
-
Automatic secure login after successful verification
Sending a portal invitation to an existing client
If you have already added a client to Zanda and want to invite them to set up their Client Portal login, you can send them a portal registration link from their profile.
There is no dedicated Send Invitation button. Instead, you can send the registration link using a communication template that includes the {PortalRegistrationLink} merge field. When the email is sent, the merge field is replaced with a client-specific registration link the client can select to set up their Client Portal access.
Step 1: Create or check for a portal invitation email template
- Go to Tools > Communication > Templates.
- Check whether you already have a portal invitation template.
- If you need to create one, select + New Template, then select Email.
- Fill in the template details:
- Name: For example, Portal Invitation
- Email Subject: For example, Access your client portal
- In the email body, write your invitation message and insert the
{PortalRegistrationLink}merge field where you want the registration link to appear.
Example email text:
Hi {ClientPreferredName},
You can now access your online client portal to view appointments, invoices, and forms.
Select this link to register: {PortalRegistrationLink}
If you have any questions, please contact us.
- Select Save.
Step 2: Send the invitation from the client’s profile
- Open the client’s profile.
- Go to Communication > New Email.
- Select your portal invitation template from the template dropdown.
- Review the email.
- Select Send.
The client will receive an email with a direct link to set up their portal access. Once they complete the process, their portal account is linked to their existing client profile in Zanda. A duplicate client record is not created.
Tips
- The
{PortalRegistrationLink}merge field generates a client-specific registration link for the selected client. The link uses the client’s existing profile and is valid for 7 days. It is not a one-time link, so the client can open it as many times as they need within those 7 days. - You can also include
{PortalRegistrationLink}in your new client welcome email template, so new clients receive the link as part of your onboarding workflow. - To find all available merge fields, including
{PortalRegistrationLink}, go to Tools > Communication > Templates, open any email template, and select Available Merge Fields in the editor.
Frequently Asked Questions
Does someone at my practice need to review or approve a new client before they can book?
No. Client Portal registration doesn’t include a review or approval step. Once a client enters a valid verification code, their account is created and they’re logged in immediately. Your team receives a notification, but doesn’t need to act before the client can book.
Require Clients to Register/Log in First (see Settings That Control Registration, above) doesn’t change this. It only controls when in the booking flow a client is prompted to register, not whether anyone reviews them first.
If you want a chance to check new clients before they book with a specific practitioner, see Setting Up Online Bookings on Client Portal for a manual workaround using a placeholder practitioner profile.
I received a “New Client Registered” notification for someone I don’t recognize; is this a security problem?
Not necessarily. This notification isn’t related to password resets; it’s the New Client Registration notification, and Zanda sends it every time someone completes registration through your Client Portal, whether or not you recognize their name.
Your Client Portal’s Register button is visible to anyone who isn’t logged in. Unless you’ve turned off Allow New Clients to Register, completing the registration process creates a new client profile immediately, with no review or approval step first (see “Does someone at my practice need to review or approve a new client before they can book?” above). An unfamiliar name on its own is expected behavior under open registration, not a sign that your account was accessed without permission.
To check a specific registration:
- Open the client profile and confirm the name, email address, and mobile number look like a genuine new client rather than a mistyped duplicate.
- Check Communication > Activity on the profile for any portal invitation or password reset emails your team already sent them; this can show whether the registration matches an invite you sent.
- If your practice doesn’t want open registration, turn off Allow New Clients to Register in User menu > Account Settings > Schedule > Client Portal > Access and Settings, so only clients your team has already added can log in and reset their password.
If you still believe an account was created fraudulently or with someone else’s details, contact Zanda Support so we can help you investigate.
Will a client who registers through the Client Portal be added as a “Contact” instead of a full client profile?
No. Client Portal self-registration always creates a full client profile.
A “Contact” in Zanda is a different kind of record. It links a related person, such as a guardian, or emergency or billing contact, to an existing client’s profile. It isn’t a lightweight lead or prospect record, and self-registration never creates one. If you want a way to collect and review prospective-client details before a full profile exists, see Collecting Details From New or Prospective Clients Through Your Website.
Should I send clients {PortalRegistrationLink} or {ClientPortal}?
Use {PortalRegistrationLink} when you are emailing a specific client and want them to set up access to their existing Client Portal profile. This link takes them through the registration/password setup flow for their client record, so they may see wording such as Please enter a new password for your account. That message is expected when the client is setting up or resetting their portal login.
Use {ClientPortal} when you want to send the general Client Portal homepage link. This takes clients to your portal, where they can log in, select Register, or start an enabled booking workflow.
Is the portal registration link one click only, or can a client use it more than once?
The registration link is not single-use. A client can open it as many times as they need for the full 7 days it stays valid, on any device—opening the link does not use it up.
If a client opens the link again after they have already set their password, entering that same password returns This password cannot be used. Please choose another password. The link is still working: the client has already registered, so they can log in with the password they set, or choose a different one on this screen.
After 7 days the link expires and the client sees The link you are accessing has expired. Please contact the clinic for assistance. Send another email containing {PortalRegistrationLink} to generate a fresh link.
Is there a way to tell if a client has registered on the Client Portal?
Use the client profile’s portal access actions and communication records to check for Client Portal access. The profile does not show a separate Client Portal Registered status.
- Open the client’s profile.
- Go to Admin > Manage.
- Use Send Password Reset Link when you need to send the client a link to set up or reset their portal login.
- Go to Communication > Activity to review sent and received communication for the client, such as portal invitation or password reset emails.
These checks can help you confirm whether portal access has been sent or managed for the client. Use your communication history and any portal notifications your practice has configured as the closest available signals.
Can I get a list or report of all clients who are registered for the Client Portal?
Zanda tracks Client Portal registration per client, not as an account-wide report, so there is no built-in report or export that lists every client who has already registered . To check an individual client, use the steps above (Admin > Manage on their profile).
To track registrations going forward, connect Google Analytics to your Client Portal. Once connected, Zanda sends a user_registration event to your GA4 property each time a client completes registration (and a user_login event each time they log in), so you can build a report or alert on new activity from that point on. See Integrating Google Analytics With Your Zanda Client Portal to set it up.
If a full historical report like this would help your practice, submit the idea through the Customer Ideas Portal.
What should clients do if they see “Message request limit exceeded. Please wait and try again.” when requesting an SMS verification code?
This message means Zanda has paused new verification-code messages for the moment because the portal message request limit has been reached. Ask the client to wait before selecting Resend the verification code again.
If the client needs immediate access and email verification is appropriate for your practice, use email verification instead. Then ask the client to request a new code.
What if a client isn’t sure whether their code went to email or text message?
The verification-code screen doesn’t repeat where the code was sent; that confirmation only appears on the previous screen, before the client clicks Get verification code. If a client can’t remember, ask them to check both the email inbox (including spam or junk) and text messages on the mobile number used to register, since exactly one of them will have received the code.
If neither turns it up, the client can select Resend the verification code, or close the registration window and start again to see the delivery method noted on the first screen.
Can clients from other countries register if SMS verification is turned on?
Mobile number validation checks the number against your clinic’s own account country, not the client’s. If your account country is Portugal, a client registering with a non-Portuguese mobile number will see it rejected as invalid, even when the number itself is correct.
If your practice has clients based in other countries, switch Client Verification Method to Email verification in User menu > Account Settings > Schedule > Client Portal > Access and Settings. This makes the mobile number optional, so clients register and verify their account using a code sent to their email instead.
What does “Your registration can not be completed. Please contact [your practice] with the registration details you have entered.” mean?
The client sees this message when more than one client profile in your account matches the details they entered: the same first and last name, plus the same email address (or the same mobile number, if your Client Verification Method is SMS). Zanda can’t tell which profile to connect them to, so it stops the registration instead of guessing.
This usually means there’s a duplicate profile for the same person.
Important: Archiving the duplicate won’t fix this. The Client Portal still matches against archived profiles, so an archived duplicate keeps causing the message. Flagging the duplicate for deletion doesn’t fix it straight away either. It keeps matching until the 48-hour deletion window ends and the profile is permanently deleted.
To fix it:
- Find both profiles. Go to People > Search > Advanced search (with the Clients profile type selected). If you’ve already archived the duplicate, set Archived to Archived Clients Only to find it. If you flagged it for deletion, set Archived to Flagged For Deletion.
- Merge the duplicate into the profile you want to keep. See Merging Duplicate Profiles. The profile you merge away no longer matches on the Client Portal, so only one profile is left.
- Ask the client to register again using the same details.
If the two profiles really are two different people who share a name and email address or mobile number, change the email address or mobile number on one of them so that each profile’s details are unique.
More Client Experience
What Clients See When Something Goes Wrong
The Client Portal displays clear, friendly messages such as:
-
Incorrect or expired code
-
Invalid email or phone number
-
Weak password
-
Message request limit exceeded
-
New client registration not allowed by the clinic
-
Registration can’t be completed because more than one profile matches
-
Maintenance or connectivity issues
These messages guide clients on what to do next—usually retrying the step or contacting your clinic.
After Registration: A Smooth Experience
Once the account is created, clients can immediately (depending on your client portal configuration):
-
Book appointments or classes
-
View invoices and payments
-
Access forms
-
Join waitlists
-
Update personal details
-
Join Telehealth sessions
Everything continues seamlessly from wherever they started the registration process.