
Accessing the Form Designer
You can use the Form Designer to create intake forms, pre-appointment screening forms, consent forms, etc to collect information from your client. Below we go over and break down each of the types of fields you can use within your Form as well as how it will be displayed to your receiving client.
- The Form Designer can be accessed under Tools > Form Designer.
- You can also open it from User Menu > Settings > Communication > Form Designer.
- If you cannot see Form Designer in either location, check that your user has the Manage Note and Form Templates permission enabled.
- From here, you can select and open an existing form template to review or edit.
- Use the Search by Name field on the Form Designer main page to quickly find templates.
- How it works: Simply start typing in the search box featuring a magnifying glass icon. The list filters in real-time.
- Filtering: Matches any part of the template name (substring match) and is case-insensitive.
- Show Inactive: Works in conjunction with the “Show Inactive” toggle to filter active or all templates accordingly.
- The list also includes a Scored column, between the Type and Visible on the portal columns. It shows Yes when scoring is enabled on that template and No when it isn’t, so you can check a template’s scoring status without opening it. See Using Scored Forms to enable scoring on a template.
- Use the Search by Name field on the Form Designer main page to quickly find templates.
- Alternatively, you can click the + New Form Template button. This will open the form template create screen.
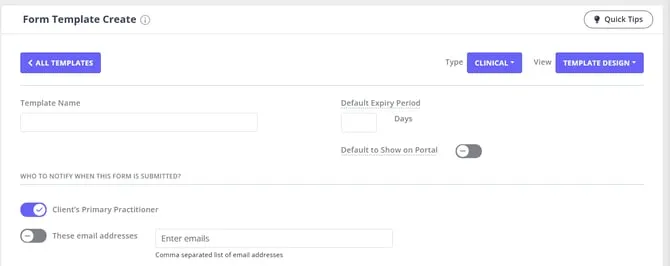
- Once you are in an Online Form Template, you can add or remove sections using the buttons on the page.
- Within each section, you can add or remove Fields.
- Most fields also have the option to require an answer, including Client File Upload. Two field types don’t, and are always optional: Information and Switch (the field under the Yes/No heading). If not all required answers are filled out, it will not show the Form as completed.
- Most of the fields have an option to set a default answer: this is a pre-filled response that appears automatically in a form field when a form is opened. This helps streamline the form-filling process for your clients.
For example:
Question: Do you have private health insurance? (Yes / No)
Default answer set to: Yes → “Yes” will already be selected when someone opens the form.
❕Remember, clients can always change the default answer if it doesn’t apply to them!
Can a field auto-fill or auto-calculate a date, like today’s date or a date a set number of months out?
No. A form field’s value can only come from one of two places: a Linked Profile Field pulled from the client’s existing profile data (see Linked Profile Fields below, which covers fields like the client’s name, date of birth, email, and phone numbers), or a fixed default answer you type into the field when building the template. Neither option computes a value at the time the form is filled in, so there’s no way to have a field automatically show today’s date or a date offset from today (for example, 12 months from now). If you need a completed form to record a computed date, have the client (or your team) enter it manually when the form is filled in.
Removing a field from a form
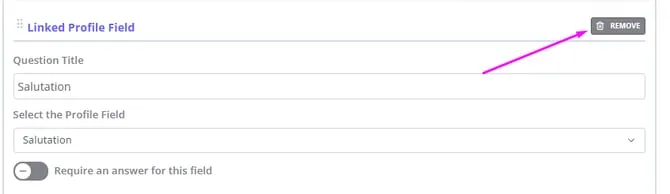
Any field on a form template can be removed, including standard Linked Profile Fields such as Pronouns. To remove one, open the form in Tools > Form Designer, select the field you want to take off, and click Remove (the trash icon on the field).
Removing a field only takes it off this form. It does not delete anything from the client’s profile—the field and any information already saved against it stay on the profile, and the field is still available to add to other forms.
- We will alert you to save changes before navigating to something else.
- If you don’t, however, you’ll be prompted if you want to bring back any unsaved changes to your Online Forms when you return to the form you were editing before.
- This can happen even if you’re sure you already saved: Form Designer keeps a working copy of your edits in your browser as you type. If you make a further change after your last save and then leave the page without saving again (closing the tab, using your browser’s back button, or navigating away after the warning above), that change stays in your browser but never reaches your account. The next time you open that same template, Form Designer finds the leftover browser copy and asks if you’d like to bring it back.
Now we will go over each field you can add within the Form Designer.
Single and Multiple Line Text
These fields will be used when you want your client to respond to the question with a couple of words or a couple of sentence answers.
- Single Line will allow for a couple of words or a sentence of text with limitation of 80 characters per one field.
- If you need more than that you will want to use Multiple. The Multiple Line field input limitation is 1000 characters per one field.
Select Single and Multiple Values
This field is used for Multiple Choice questions.
- With Multiple Value, this would allow you to list out answers and allow clients to select multiple answers. You can set it up as switches, drop-down list or checkboxes option.
- With Single Value, the field allows the user to select only one answer from the list. You can set it up as radio buttons or as a drop-down option
How do I remove a default answer from a multiple choice field?
You don’t need to delete the option and add it again. Open the template in Tools > Form Designer, find the Select field, and look at the switches next to its options. The option with its switch turned on is the current default answer.
- Select Single Value (radio buttons or drop-down): hold down the Ctrl key and click the switch that is turned on. The switch turns off, and the field no longer has a default answer. A plain click without Ctrl won’t turn it off. Clicking a different option’s switch moves the default to that option instead.
- Select Multiple Values: click the switch next to each default option to turn it off.
Click Save Template when you’re done.
If Ctrl + click doesn’t clear the default on your computer, you can still remove the option with the trash icon and add it back. An option you add is never set as the default.
Yes/No Switch
This field can be used for any Yes/No or either/or type Questions. It would appear to you client with the toggle being on for Yes, or off for No.
Is there a checkbox or tick box field?
Use the Yes/No Switch field above for a single Yes/No or consent-style tick: it appears to your client as a toggle they switch on for Yes, or to give consent, and off for No. If you want your client to tick one or more options from a list, use a Select field set to Multiple Values, which you can display as switches, a drop-down list, or checkboxes. The Form Designer has no separate field type labeled “Checkbox” or “tick box” - these are the closest equivalents.
Draw/Annotation
This area would be used to circle or mark on a diagram or picture of the body or part of the body. You can upload an image into this field depending on what you are needing.
- The Client can use the arrows, text and pen icons at the bottom to draw on the image.
- When making the text annotation, it is necessary to hit the Enter key once the text is typed up, to have it saved on the chart.
- The trash can icon is there so they can remove any accidental annotations they may create.
- Use the ‘hand’ button to untick the annotations made, to be able to move them around or in the trash bin.
- If the image needs to appear in the completed form PDF, use a Draw/Annotation field. The uploaded image and any annotations are included when the form is printed or downloaded as a PDF.
- All four tools, hand, arrow, text, and pen, stay available to the client throughout, and they can freely switch between them while completing the field.
Image requirements: Upload a .jpg, .jpeg, .png, or .webp image of up to 1 MB, measuring up to 800 pixels wide and up to 1200 pixels tall. An image over those dimensions is not added to the field, and Zanda shows a message with the allowed width and height, so resize the image first and upload it again. There are some free online tools that you can use like Adobe. At the Resize step in the Resize For field, please select Custom from the dropdown, and then type the desired Width dimensions. The Height will update automatically.
Information
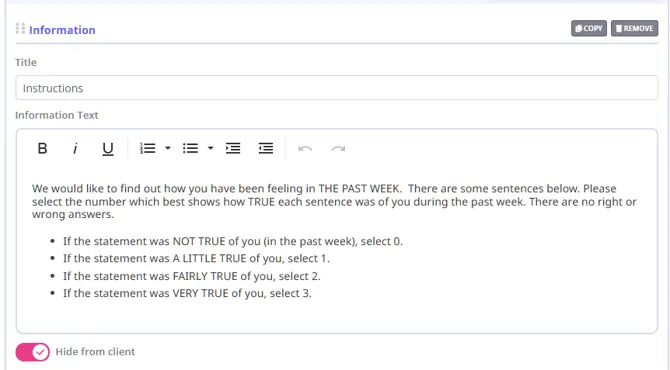
This is just a field where you can input information.
-
Use the formatting tools (bold, italics, underline, increase and decrease indent, ordered and unordered lists and undo and redo buttons) to enhance the readability and presentation of the text.
-
This is not an area for the client to supply an answer on this so it will appear as plain text to the client.
Using the Hide From Client Option on Form Fields
The Hide from client option lets you include internal notes or guidance on a form that only your team can see when viewing completed forms in the client profile. These fields are hidden from clients when they complete the form and are also excluded from print/PDF copies.
This can be useful for:
- Internal instructions for practitioners (e.g. “Check Medicare card details against photo ID”)
- Context or reminders for your team that you don’t want to share with clients
- Internal commentary that should not appear in exported or printed documents
Where you can use Hide from client
The Hide from client toggle is available on the following field types in the Form Template Designer:
- Information fields
- Multi-line Text fields
The toggle:
- Appears in the field settings when you add or edit one of these fields
- Is off by default
Note: The Hide from client option is not available on other field types.
How to enable Hide from client on a field
- Go to Tools > Form Designer and open a Form Template.
- Add a new Information or Multi-line Text field, or click an existing one to edit it.
- In the field settings, locate the Hide from client toggle.
- Turn the toggle on to hide this field from clients.
- Save the form template.
The toggle state is saved with the form template and does not affect any other field settings.
What clients see
When Hide from client is enabled on an Information or Multi-line Text field and a client opens the form to complete it:
- The hidden field’s label and content are not shown to the client.
- The field does not take up any space in the layout – the form appears continuous, with no visible gaps.
What your team sees in the client profile
When a user (such as a practitioner or admin) views the completed form in the client profile:
- The hidden field’s label and content are visible.
- The field appears in its original position within the form, so the context is preserved for your team.
This means you can safely add internal-only text while still seeing it in-line with the rest of the responses when reviewing a form in the client’s record.
Printing and PDF exports
If a form includes fields where Hide from client is enabled, and you:
- Print the form, or
- Generate/attach a PDF of the form to any communication
then:
- The hidden field’s label and content are not included in the printed or PDF output.
- The field does not leave a blank space in the document layout.
This ensures internal notes or instructions never appear in client-facing printouts or attachments.
Signature
Use this field when you need your client to sign the document you are creating. The standard Signature field collects a typed full name and displays it in a signature style on the completed form.
Pro Tips💡
- You can add multiple signature fields to a single form template if you require more than one party (for example, both parents or a client and an external witness) to sign the form before submission.
- For a drawn signature area, add a Draw > Annotate a chart field and upload a plain colored image. The field accepts .jpg, .jpeg, .png, and .webp files of up to 1 MB, sized up to 800 pixels wide and 1200 pixels tall. A useful size for a signature box is approximately 80 pixels high x 450 pixels wide. Your client then signs inside that box using the pen tool. Note that the arrow, text, and hand tools remain available alongside the pen tool, so a client could type text into the signature box instead of hand-drawing a signature.
Linked Profile Fields
Type: Linked Profile Field
When you send clients a form that has Linked Profile Fields, the information your clients type in there will be auto-populated in the same respective field in their profile. This will give you the option to add:
- First Name
- Last Name
- Mobile Phone
- Home Phone
- Address
- City
- State
- Postcode
- Country
- Time Zone
- Date of Birth
- How Did You Hear About Us
- Preferred Name
- Gender*
- Sex
- Gender Identity
- Pronouns
- Occupation
- Salutation
- Subscribe to Marketing Communication
- Personal Data Consent
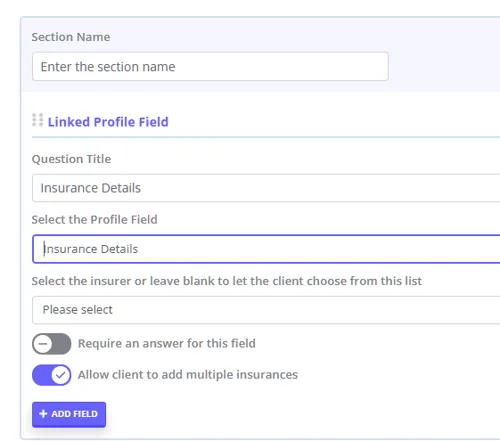
- Insurance Details (this can be used to collect the client’s details for insurers you have set up in User Menu > Account Settings > Payments > Insurers, for both public and private health insurers e.g. Medicare, DVA, NDIS, NHI etc).
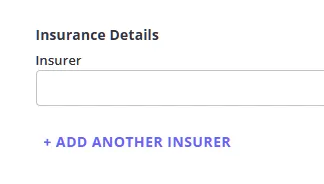
- If you have configured multiple insurers in your Zanda account settings, and want to allow your clients to add multiple insurances with their details, enable the available switch.
- When clients fill in the form, they will see the option to add another insurer:
- For any insurance type that is Medicare (AU), DVA, NDIS, or NHI, when the client enters their insurance details on an online form, upon submission the system will update the existing insurance record for that client with the new details provided. This will ensure you can continue setting the insurance as a default for new clients without it resulting in duplicate insurance records when the client submits an online form.
- When Allow client to add multiple insurances is off, which insurer’s fields appear depends on how the form was built. If an insurer was selected on the Insurance Details field in the Form Designer, the form always shows that insurer’s fields. If the field was left blank, the form uses the client’s own insurer, so a client with DVA sees DVA fields and a client with Medicare sees the Medicare number, IRN, and expiry month and year. To control which fields a client sees, check the Form Designer field first, then the client’s insurer.
- Unlike other linked profile fields, Insurance Details can be added to the same form template more than once, so you can collect different insurers in separate sections (for example, one instance for Medicare and another for NDIS). Each instance keeps its own title, Require an answer, and Allow client to add multiple insurances settings, and an insurer already selected on one instance is excluded from the insurer list on another. If you add two blank Insurance Details fields with pre-population turned on, only the first one pre-fills with the client’s existing insurer; the second stays blank rather than repeating it.
- Credit Card (Stripe) - using this field you can collect client credit card details via an online form and have it stored in Stripe securely (you need to have a Stripe integration enabled in your Zanda account to see this linked profile field available.)
- New Contacts - using this field you can collect clients contacts information and it will be automatically added to the Contacts section of the client profile when the form is submitted. You can also turn on Insurance to collect a contact’s own insurance details, including Medicare details where the selected insurer is Medicare. Learn more here. It is possible to allow clients to add multiple contacts details witch will be added to their clients profiles automatically - no manual input needed.
None of the Linked Profile Fields above, including New Contacts, create or update a third party profile; they only update the client who submits the form. To keep a plan manager’s or other third party’s details on file, see Understanding Third Party Profiles.
*Important Notes:
-
If you created your Zanda account after the 12th of July 2023, you will not see the Gender field on the Linked Profile Fields list as it was removed from the system. Accounts that were opened before that date will still have the option to use this field.
-
The Country field is a dropdown of country names, so you can use it to show clients which country you expect them to select. The Address field is free text, though, with no setting to restrict or validate entries to a single country, and a client can still choose a different option from the Country dropdown. Marking Country as a required field only ensures the client answers it; it does not limit their answer to one country.
-
Each Linked Profile Field can only be used once per form template, with one exception: Insurance Details can be added more than once, so a form can collect details for more than one insurer (see the note under Insurance Details above). Once any other linked profile field has been added, it no longer appears in the Select the Profile Field list for that form. This is different from standard fields such as signature fields, which can be added as many times as you need.
-
Once a Linked Profile Field has been added to a form, its field type is fixed and cannot be changed afterward. To use a different field type, remove the field and add a new one in its place with the type you want. If you’d like to see this work differently, let us know through the Customer Ideas Portal.
-
Linked Profile Fields update the matching client profile details when a client submits a generated form link. They also update the profile when your team completes a form directly in the client’s profile under Records > Forms or Admin > Admin Forms by saving and completing the form.
-
Leaving a Linked Profile Field blank when a client submits the form does not clear or change the existing value already stored on their profile. If no answer is given, that profile field is left exactly as it was.
-
Pre-populating existing client data into linked profile fields is a separate setting. To pre-fill online form drafts with existing client data, follow the instructions provided in this article
Type: Custom Profile Field
Custom profile fields are specific to your Zanda account and will be available in your online forms Form Designer only if you’ve already set them up. All Custom Profile Fields are created and managed from User Menu > Account Settings > Clients > Custom Profile Fields.
If custom profile fields have been configured in your account,
-
Choose the field to link
-
Only active fields appear
-
Fields already used on the form won’t be shown
-
-
The question type and options automatically match the linked field.
How linked fields behave
-
Field input matches the Custom Profile Field type
-
Select options stay in sync with custom profile fields settings
-
Fields can pre-populate from profile data (if enabled)
When the form is submitted:
-
Answers write back to the profile
-
Leaving a Custom Profile Field blank when the form is submitted removes any value already stored for that field on the client’s profile - it does not leave the existing answer in place. This is different from a Linked Profile Field (see above), which is left unchanged if no answer is given.
This allows structured data collection without manual re-entry.
Client File Upload
To allow your clients to upload files to the form, you can add a Client File Upload section.
-
The maximum size per file is 30 MB.
-
It can only upload: .jpg, .jpeg, .png, .csv, .xls, .xlsx, .zip, .pdf, .docx, .txt, .html, .htm, .heic file types.
-
There is a maximum of 10 files allowed per upload field.
-
You can have multiple upload fields on a single Online Form.
-
Clients can delete a file that has been uploaded before the form has been submitted.
-
Clients will not be able to view the file they have uploaded (for privacy purposes), only the name of the uploaded files. The form PDF also lists uploaded file names rather than embedding the uploaded image or file content.
-
Any files uploaded by the client will be accessible on the Online Form when viewed in the client profile.
- These files will also be automatically uploaded in client profiles > Records > Files as clinical files and will be visible to authorised practitioners and users with access. If needed, a user with access can open such a file in Records > Filed and enable the ‘Is Admin File’ switch to move it to Admin > Admin file forlder to grant access to the admoin team.
- Clients will be able to access such files in their client portal in the My Documents > Your Uploads page to view and download the files they shared with the practice via an online form.
-
Users with access to the Online Form will be able to view and delete the files, though they cannot upload them into this section.
-
File previews use the browser preview for whatever browser you’re using, eg. a .heic file is an Apple file, which cannot be previewed on a Windows device.
Adding, Copying and Reordering Sections
- To add a new Section to your Online Form Template,
- Scroll down to the end of the Online Form Template.
- Click on the Add Section button.
- Create the section as needed.
- Tocopy existing sections in the Online Form Template:
-
Click the ‘Copy Sections’ button at the top-right of the section
-
A ‘Paste Section’ button will appear at the end of the online form template, on the left-hand side. Click it to paste the copied section to the template.
- To reorder this new section or any other existing sections in the Online Form Template:
- Click on the Reorder Sections button;
- Grab the six dots in front of the section name to drag and drop the sections as needed;
- Click on the Finish Reordering to get back to the full template view.
Adding, Copying and Reordering Fields
- To add a new field to a section,
- Scroll down to the end of the section
- Click on the Add Field button
- Select the type of field you want to add
- Tocopy existing fields in the Online Form Template:
-
Click the ‘Copy’ button at the top-right of the question
-
A ‘Paste Field’ button will appear at the end of the online form template, on the left-hand side. Click it to paste the copied field to the template.
-
To reorder a field,
- Grab the six dots in front of the field name
- Drag and drop the field in the desired position. The field can be reordered within the same section, and also dragged into any other existing section of the form.
Field layout
Fields in an online form template display one below another, in the order you place them within their section, each on its own row. To keep two related fields together, such as First Name and Last Name, place them next to each other in the field order; they still display as separate rows, one above the other, rather than side by side in the same row.
To change the order fields appear in, grab the six dots in front of a field’s name and drag it into place, as described above. If you want to show instructional text or a link between fields without collecting an answer, add an Information field instead.
Previewing Form Template
At any stage of creating or updating your form templates, you can get a quick preview of what it would look like for your account users and your clients. To help you with that, there is the View dropdown button available at the very top-right corner of each Online Form Template:
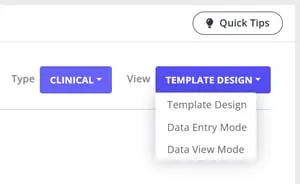
- Template Design view is selected by default when you open an existing template or start creating a new one in Tools > Form Designer. In this view, Select fields always show their options as an editable list of switches or radio buttons, so you can add, edit, and reorder answers, whatever display style you’ve chosen.
- Select Data Entry Mode to preview what your clients will see when they open a form that was created for them using this Online Form Template. This is where you’ll see the display style (switches, checkboxes, radio buttons, or drop-down list) you chose for each Select field.
- Select Data View Mode to preview what an account user will see when viewing data that was entered by a client in a form created from this Online Form Template. This is also how a completed form looks when you open it in a client’s profile. In this view, answers show as a read-only summary. For Select fields, only the options the client chose appear, on one line separated by commas, for example Anxiety, Sleep, Stress. Options the client didn’t choose aren’t shown.
Understanding the Actions Menu
💡 Note: The Actions menu gear icon is only visible from the Form Designer
main template list (Tools > Form Designer). If you are currently inside
an open template editor, click the “ALL TEMPLATES” button at the top-left
to return to the list and access the gear icon.
To open the Actions menu, click on the gear icon on the far-right of each template.
From this menu, you will be able to:
- Edit the online form template;
- Clone (duplicate) the online form template: clicking here will create an exact copy of this form template in the list of all your templates. It is useful when you need to have a few versions of the same form, each of which slightly differ: you can easily edit the cloned copy to implement those changes.
- Export the online form template into a .txt file: this is useful if you use Zanda accounts to run separate businesses, but would like to use the same form templates in all your Zanda accounts. Once you have exported the form template from one account, you will be able to import it into another account via the Import From File button at the top-right corner of the Tools > Form Designer page.
- Deactivate the online form template. This is the only way to take a form template out of use. Form templates are never deleted, and deactivating one does not affect any form already created from it. See Can I delete a form template once clients have used it? below.
💡Pro Tip: If you deactivate a online form template by mistake, it is possible to find the list of all the deactivated forms by activating the Show Inactive switch at the top of the Tools > Form Designer page.
You are also able to activate the deactivated online form template if necessary:
- Enable the Show Inactive switch;
- Find the inactive form template you need;
- Click the ‘Actions’ gear icon;
- Click ‘Activate.
Frequently Asked Questions
Can I delete a form template once clients have used it?
No - see Deactivate above. Forms that were already created from that template live on each client’s own file and are separate from the template. Deactivating the template doesn’t touch them. A completed form keeps its answers, its name, and its place under Records > Forms (or Admin > Admin Forms), and stays available to view, print, and download exactly as before. A form still sitting as a draft stays where it is too, and the link the client already has keeps working.
So, nothing on a client’s file is lost when you deactivate the template they filled it in from.
Two things worth knowing before you do it:
- Remove the merge field from your communication templates first. If the form’s merge field is still in an active email, SMS, or letter template, Zanda won’t deactivate the form template. You’ll see a message listing every communication template that still uses it. Open each one from Tools > Communication > Templates, take out the form’s merge field, and save. See Creating and Managing Email, SMS and Letter Templates.
- No new forms can be created from it while it’s deactivated. Sending a communication template that contains the form’s merge field won’t produce a form for the client until you activate the template again.
Removing a single form from one client’s profile is a different job, done from that client’s file rather than from Form Designer. See Sending Online Forms to Clients.
Can I use communication merge fields in an online form template?
No. Communication merge fields, such as {BusinessName}, are designed for email, SMS, and letter templates in Tools > Communication > Templates. In Tools > Form Designer, the text you add to Information fields and other form fields is saved as part of the online form template. It is not automatically replaced by communication merge fields when a client opens the form through the client portal.
When you copy a template from the Template Library, review and update any placeholder wording in your saved copy before sending it to clients. For example, if an NDIS service agreement template includes placeholder text for your business details, open the copied template, replace the placeholder wording with the details your practice wants to show, then use View > Data Entry Mode to preview what clients will see.
Linked Profile Fields collect or pre-fill standard client profile information on forms. Custom Profile Fields collect the additional client profile information you configure from User Menu > Account Settings > Clients > Custom Profile Fields. These fields do not store your practice business details.
How do I add a date field or an email field to a form?
The Form Designer does not have a standalone Date or Email field type. You add both through profile fields, which also means the answer is saved to the client’s profile when the form is submitted.
Email address
- Open your online form template in Tools > Form Designer and click + Add Field.
- Choose Linked Profile Field, then select Email.
- The field checks that what the client types is a valid email address, and the answer is written to the client’s profile on submission.
Date of birth
- Click + Add Field and choose Linked Profile Field.
- Select Date of Birth. Clients see a date picker, and the date is written to the client’s profile.
Any other date (for example a surgery date, a review date, or a start date)
- Go to User Menu > Account Settings > Clients > Custom Profile Fields and click Add Custom Profile Field.
- Enter a Field Name, set Field Type to Date, choose the profile types it applies to, and Save. See Add and Manage Custom Profile Fields.
- Back in Tools > Form Designer, open your form template, click + Add Field, choose Custom Profile Field, and select the field you just created. It appears on the form with a date picker, and the answer is saved to the client’s profile.
If you only want the date captured as free text and do not want it stored on the profile, use a Single line text field instead — but there is no date picker, so clients type the date themselves.
❗Note: Linked Profile Field, Custom Profile Field and Client File Upload are only available on online (client-entered) form templates. They do not appear on note templates.
Can I hide the created date when printing or downloading a form?
Use Hide from client when you want eligible field content excluded from a client-facing printout or PDF. Printed forms still include the form header and metadata such as Created On, Created By, and Completed On. If the form has not been completed, the Completed On value appears as an em dash.
The Hide from client setting applies to eligible Information and Multi-line Text fields only. It does not hide the form header or standard metadata in printed forms or PDF attachments.
Can I include a photo or image in a form PDF?
Yes. Add a Draw/Annotation field when the image itself needs to appear in the completed form PDF, such as a body diagram, illustration, or photo that clients can mark up.
Use Client File Upload when the client needs to upload separate files, such as referral documents, identification, or photos for the client record. Uploaded files are saved to the client’s Files list as Client Uploads and the form PDF shows the uploaded file names, not the file content.
Why don’t I see an upload option for Client File Upload when I fill in a form from the client’s profile?
The Client File Upload option only appears when a form is completed through the Client Portal or the client’s own form link. If you fill in the form directly from within the client’s profile, this section does not show an upload control.
To upload a file on the client’s behalf while you are in their profile:
- Open the draft form.
- In the top-right corner of the form, click the Go to Portal Form icon. This opens the client-facing version of the form, where the Client File Upload option is available.
- Upload the file there. This saves it to the client’s profile the same way a client-submitted upload would.
You can also use the clipboard icon next to it to copy the client’s portal form link, if you would rather open it elsewhere.
How do I set up a service agreement document to send to clients?
Create the agreement as an online form template in Tools > Form Designer. Use Information fields for the agreement wording, add Signature fields where the client needs to acknowledge or sign, then send the completed template using an online form link. For the sending steps, see Sending Online Forms to Clients.
Can I change a Single line field into a Custom Profile Field?
No. To collect a response that writes back to a client profile, add a new Custom Profile Field field to the form instead. Click Add Field, choose Custom Profile Field, select the active custom profile field you want to link, and remove the old Single line question if you no longer need it.
Can I use conditional logic to show or hide form fields based on a client’s answer?
Form templates do not support answer-based conditional logic that shows or hides later fields while a client completes the form. Use Hide from client only for Information or Multi-line Text fields that should always be hidden from clients, and use Scored Forms when you need Zanda to calculate scores from selected answers.
Is it safe to leave linked fields blank for clients who don’t need them?
It depends on the field type. A Linked Profile Field left blank does not change the client’s existing profile value, so it’s safe to leave unanswered. A Custom Profile Field left blank is different: submitting the form removes the client’s existing value for that field entirely.
Can I insert a hyperlink into a form?
Form Designer does not include a dedicated hyperlink button in the text-formatting toolbar, so typing or pasting a plain web address into an Information field does not turn it into a clickable link; it stays as plain text, which clients would need to copy into their browser themselves.
If you want clients to see and use a working link, copy the linked text from somewhere it is already a clickable hyperlink (for example, a webpage or a document) and paste it into the Information field. The hyperlink carries over and stays clickable for clients. Before sending the form, use View > Data Entry Mode to preview how the Information field will appear to clients.
Can I attach or embed a PDF or other document in a form?
To share a document such as a pricing sheet with a client, upload it under Records > Files or Admin > Admin Files, then switch Show to Client on Portal to ON. See Uploading Files or Documents in Client Profiles for the full sharing steps. If Client Files is enabled on your Client Portal, the client will find it under My Documents, separate from the form itself.
Form Designer itself doesn’t have a way to insert a file or its content into a form the way a communication (email, SMS, or letter) template does. Client File Upload, described above, isn’t a fit here either since it only lets the client send files to you, not the other way around.
Why do my Select field options show in a vertical list in the Form Designer, but on one line in Data View Mode?
This is how Data View Mode works. It isn’t a display error, and it doesn’t depend on your screen size or how long your answer labels are. Changing the field’s Display As setting only changes how the field looks while the form is being filled in, not how the completed answers are shown.
If you’d rather see each option on its own row when reviewing completed forms, add a separate Yes/No Switch field for each option instead of a single multiple-value Select field. Fields display one below another, so each option gets its own row, with its question title and the client’s Yes or No answer.
Can clients expand and collapse the sections of an online form?
No. When a client opens an online form through the client portal, every section is displayed inline as one continuous form that they scroll through from top to bottom—there is no per-section expand or collapse control for the client, and this cannot be configured in the Form Designer.
To keep a long form manageable for clients, structure it with clear section labels and use Reorder Sections to group related questions together, so the flow reads logically as the client scrolls. You can preview exactly what the client will see at any time with View > Data Entry Mode.
Expand and collapse controls are available to your practice’s users when viewing a completed form in the client’s profile—a Collapse All or Expand All option helps when reviewing long submitted forms—but this is a viewing aid for staff, not something the client sees while completing the form.
I opened a form template and got an error message. What should I do?
If you open a form template in the Form Designer and see a banner such as “We’ve encountered an unexpected issue,” it usually means the page didn’t finish loading correctly in your browser rather than a problem with the form template itself.
- Reload the page (Ctrl + F5 on Windows, Cmd + Shift + R on Mac) and open the form template again.
- Clear your cache and cookies, sign back in, and try again.
- Try a different supported browser, or an incognito/private window with browser extensions turned off. Ad blockers, privacy extensions, and strict network filtering can stop parts of the Form Designer from loading.
If the error still appears on every form template after trying the steps above, contact support with a screenshot of the banner and the name of the form template you were opening so the team can investigate further.
Can I collect referrer information the same way I collect contact information on a form?
No. The Linked Profile Fields list does not include a dedicated Referrer or Referral field, so referrer details cannot be written straight onto a Referrer profile from an online form.
A suggested workaround: to collect referrer information through an online form automatically, add a New Contact linked field instead and give it a custom Relationship Type—for example GP —so the referrer’s details are captured as structured contact fields rather than free text. See Add Contacts to Client Profiles Using Online Forms for the full setup.
Once the client submits the form, open the new contact’s profile, go to Admin > Manage, and turn on the Referrer role. The profile becomes a referrer with all its details already filled in, so nothing needs to be re-entered. See Managing Referrers and Referrals for more on referrer profiles.
What causes the “Would you like to restore unsaved data?” prompt?
Form Designer keeps a working copy of your edits in your browser as you type, separate from the copy saved to your account. This prompt appears when Form Designer finds a leftover browser copy for that template still there when you reopen it, which happens whenever you made a change after your last completed save and then left the page without saving again, for example by closing the tab, using your browser’s back button, or navigating away after the unsaved-changes warning described above.
Choose Yes to bring those changes into the editor so you can review and save them, or No to discard the browser copy and keep the template as it was last saved. To avoid seeing this prompt, click Save Template after every change before you leave the page.
Can I restore a form template to a previous version?
If your template is missing changes you expected to see:
- Open the template again in Tools > Form Designer. If you see the Would you like to restore unsaved data? prompt, your last changes were never saved to your account but are still in your browser. Choose Yes to bring them back, then click Save Template. See the question above for why this happens.
- If there is no prompt, the changes can’t be recovered and will need to be made again. Forms you already sent or that clients already submitted aren’t affected. They keep the content they had when they were created.
To keep a copy before you make major changes to a template, open the Actions menu (the gear icon next to the template in the Form Designer list) and either:
- Export the template to a .txt file. You can import that file again later with Import From File to get that version back as a template; or
- Clone the template, which keeps an exact copy in your template list while you edit the original.
A form template keeps only its latest saved version. Each time you click Save Template, the new version replaces the old one, and Zanda has no template version history for you or our support team to restore. The Restore previous version option described in Getting Started with Online Forms works only on an individual form in a client’s record (Records > Forms or Admin > Admin Forms), not on templates in Tools > Form Designer.