
Important Note:
- The Zanda Data Export feature meets AHPRA requirements and provides data in formats suitable for subpoenas or other legal requests.
- When exporting data from client profiles for individual clients, you can also generate PDF files that are often suitable for use in court cases or when responding to subpoenas, as they provide a complete, chronological, and non-editable record.
Exporting Profile PDF (recommended)
The fastest way to produce a legal-ready PDF from a single client’s profile is Export Profile PDF. In one step it bundles the client’s communications and clinical records — SMS, Emails, Letters, Notes and Forms — into a single PDF, processed in the background so you can keep working while the file is prepared. This replaces having to print each section separately, and it lets you include communications (SMS/Emails/Letters) in a profile PDF directly, without going to the CSV data export.
Who can use this feature
- Users need both of these user permissions:
- Communication Menu
- Access all Clinical Notes/Forms
- If either permission is missing, the Export PDF option won’t appear in the client’s Admin menu, and opening the page directly will be blocked. Master Users always have access.
- To check or change these, go to User Menu > Account Settings > Team > Users, open the user’s profile, and review their permissions. (Only a Master User, or a user with Setup and Configure Zanda, can change permissions.)
- Note: Advanced Client Search and Export and Access all Client Communications are different permissions and are not required for this feature.
How to export a Profile PDF
- Open the client’s profile.
- Go to the Admin menu.
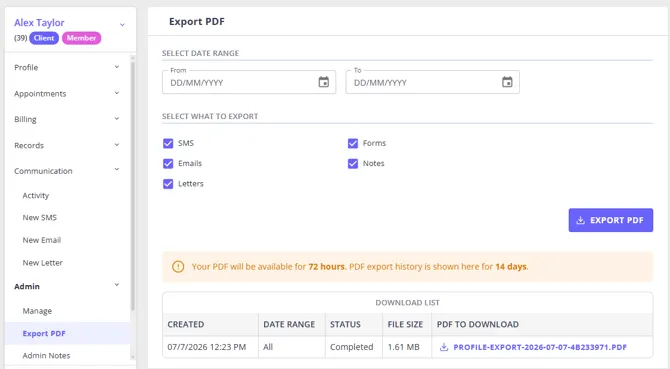
- Select Export PDF (listed under Admin; this is the Export Profile PDF feature).
- (Optional) Choose a date range. If you don’t select one, all available dates are included. Dates are filtered using the Singapore (SG) timezone, and displayed using your country’s regional date format.
- Under Select what to export, choose one or more of: SMS, Emails, Letters, Notes, Forms. At least one option must be selected — otherwise you’ll see “Please select at least one item to export.”
- Select Export PDF.
While the export runs
- A confirmation message appears and the export processes in the background — you can safely leave the page.
- A new entry is added to the download list showing the creation date/time, selected date range, status, file size, and (once ready) the download link.
- The Export PDF button is disabled while an export is in progress, and a Cancel option is available.
Downloading and retention
- When the export finishes, its status changes from In Progress to Completed and a download link with the generated filename appears. Select it to save the PDF.
- Generated PDFs are available to download for 72 hours; export history remains visible for 14 days. (If you leave and return, the download list shows the current status of your previous exports.)
What’s in the PDF
- Depending on the options selected, the PDF may include SMS messages, Emails, Letters, Notes and Forms. For SMS and Emails, each item shows its communication status (for example, Draft, Sent, or Failed).
- Each PDF begins with a cover page summarising the export and identifying the client. It includes your practice logo and business name, the title Client Profile Export, the generation date/time, the client’s identifying and contact details and recorded address, the export date range, and a summary count of the items included (SMS, Emails, Letters, custom forms, and notes). Fields with no value are shown with a dash (–) rather than omitted.
Exporting Data from Client Profiles
Export Profile PDF (above) covers most legal requests in one step. For anything it doesn’t include, you can also download the following directly from the Client Profile:
- Clinical or admin notes, or forms - use the Print All button on the Records or Admin submenu’s Notes/Forms page. See Creating and Managing Session Notes and Getting Started with Online Forms for the steps.
- Invoices - print or download individually from the client’s Billing submenu. See Creating, Editing, Printing and Emailing Invoices.
- Uploaded clinical or admin files - download each file individually from the Records or Admin submenu’s Files page. See Uploading Files or Documents in Client Profiles for the steps.
- Individual emails and SMS - open the message from the Communication submenu’s Activity page and use the Print button underneath it to print or save as a PDF. See Communicating with Clients for more on managing client communications.
To include a client’s communications (SMS, Emails, Letters) in a profile PDF, use Export Profile PDF (see above) from the profile’s Admin menu. If instead you need a complete account-wide export across all clients, use the data export tool located in Tools > Data Export, which delivers a zipped CSV.
Exporting Large Data Sets
If a request covers more than one client, or needs the full account-wide data set as CSV rather than PDF, use Tools > Data Export instead. See Exporting Your Data for the full steps.
Encrypting and password-protecting CSV and PDF files
Please be aware that the instructions provided are recommendations, and Zanda does not take responsibility for the results.
Encrypting/Password Protecting CSV Files
Using Microsoft Excel
- Open your CSV file in Excel:
- Launch Excel.
- Go to
File → Openand select your CSV file.
- Save as an Excel Workbook:
- Go to
File → Save As. - Choose the location where you want to save the file.
- In the
Save as typedropdown, selectExcel Workbook (*.xlsx). - Click
Save.
- Encrypt the Excel Workbook:
- Go to
File → Info. - Click
Protect Workbookand thenEncrypt with Password. - Enter a password and confirm it.
- Save the file.
- Convert the Encrypted Excel File back to CSV (if necessary):
- Open the encrypted Excel file.
- Go to
File → Save As. - In the
Save as typedropdown, selectCSV (Comma delimited) (*.csv). - Save the file. Note that this will remove the encryption, so keep the Excel version for security.
Using 7-Zip (for Windows)
- Install 7-Zip:
- Download and install 7-Zip from here.
- Compress and Encrypt the CSV File:
- Right-click on your CSV file.
- Select
7-Zip → Add to archive. - In the
Add to Archivewindow, set theArchive formattozip. - Enter a password in the
Encryptionsection. - Click
OK.
Using macOS Terminal
- Open Terminal:
- Open Terminal from
Applications → Utilities → Terminal.
- Compress and Encrypt the CSV File:
- Navigate to the folder containing your CSV file using the
cdcommand. - Use the following command to compress and encrypt:
zip -e encrypted_file.zip your_file.csv
- Enter and confirm the password.
Encrypting/Password Protecting PDF Files
Using Adobe Acrobat
- Open your PDF in Adobe Acrobat:
- Launch Adobe Acrobat.
- Open your PDF file.
- Encrypt the PDF:
- Go to
File → Protect Using Password. - Choose
Encrypt with Password. - Enter a password and decide the type of password protection (e.g., for opening the document, for editing, etc.).
- Save the file.